


You are about to deploy your first AI agent.
Not a chatbot that answers questions. An agent — an AI that remembers, reasons, and takes action. One that runs 24/7, connected to your data, working while you sleep.
This tutorial walks you through creating and hosting an agent with Taskade Genesis. No code required. Time: about 10 minutes.
TL;DR: Taskade Genesis lets you deploy a live AI agent from a single text prompt — no servers, no code, no DevOps. Your agent gets persistent memory, 34 built-in tools, 100+ integrations, and a shareable public URL. 150,000+ apps built since launch. Start building free ->
What Is AI Agent Hosting and Why Does It Matter in 2026?
AI agent hosting is the process of deploying a persistent AI agent that runs continuously, remembers past interactions, and takes action on behalf of users. Unlike one-shot chatbots, hosted agents maintain state across sessions, connect to external tools, and operate autonomously.
In 2026, every team needs at least one always-on agent. Customer support, lead qualification, onboarding, internal ops — these are workflows that should not require a human to be online 24/7. The question is whether you build custom infrastructure or use a platform that handles it for you.
| Hosting Approach | Setup Time | Maintenance | Cost | Scalability |
|---|---|---|---|---|
| Custom code (Python/Node) | Days-weeks | High (servers, auth, uptime) | $50-500+/month | Manual scaling |
| Replit / Railway | Hours | Medium (deploys, env vars) | $20-100/month | Limited |
| AWS Lambda + API Gateway | Days | High (IAM, cold starts) | Variable | Complex |
| Taskade Genesis | 10 minutes | Zero | Free-$25/month | Built-in |
Taskade Genesis eliminates the entire infrastructure layer. You describe your agent in plain language, and the platform handles deployment, memory, authentication, and scaling.
How the Taskade Agent Architecture Works
Every Taskade agent runs on Workspace DNA — a self-reinforcing loop of three components.
- Memory — Projects store your knowledge base, conversation history, tickets, and user data in structured databases.
- Intelligence — AI Agents reason over that memory using 15+ frontier models from OpenAI, Anthropic, and Google. They have 34 built-in tools, custom slash commands, and persistent memory.
- Execution — Automations trigger workflows that branch, loop, filter, and connect to 100+ integrations across email, Slack, CRM, and more.
This is not a static chatbot. It is a living system where every interaction creates new memory, which feeds intelligence, which triggers execution.
Step-by-Step Tutorial: Deploy Your First Agent
Here is the complete walkthrough, from zero to live agent.
| Step | Task | Time |
|---|---|---|
| 1 | Open Genesis | 30 sec |
| 2 | Describe your agent | 2 min |
| 3 | Watch Genesis build | 1 min |
| 4 | Add knowledge | 2 min |
| 5 | Configure behavior | 2 min |
| 6 | Test your agent | 2 min |
| 7 | Deploy | 30 sec |
| 8 | Connect automations | Optional |
| 9 | Monitor and improve | Ongoing |
| Total | Working agent | ~10 min |
Step 1: Open Genesis
Go to taskade.com and sign in. Click "Create App" or use the prompt bar at the top of your workspace.
If you do not have an account, the Free tier gives you access to agent building immediately.
Step 2: Describe Your Agent
Enter a prompt that describes what you want:
Build a customer support agent for a SaaS product.
The agent should:
- Answer questions about features and pricing
- Be friendly and professional
- Create support tickets when it can't resolve an issue
- Remember previous conversations with each user
Click "Generate" or press Enter. Use "Enhance Prompt" if you want Genesis to suggest improvements to your description.
Prompt tips for better agents:
| Tip | Example |
|---|---|
| Be specific about personality | "Friendly but concise, like a senior support engineer" |
| Define boundaries | "Never share internal pricing, escalate billing questions" |
| Specify data sources | "Use our FAQ doc and product changelog as knowledge base" |
| Include edge cases | "If the user is frustrated, acknowledge their concern first" |
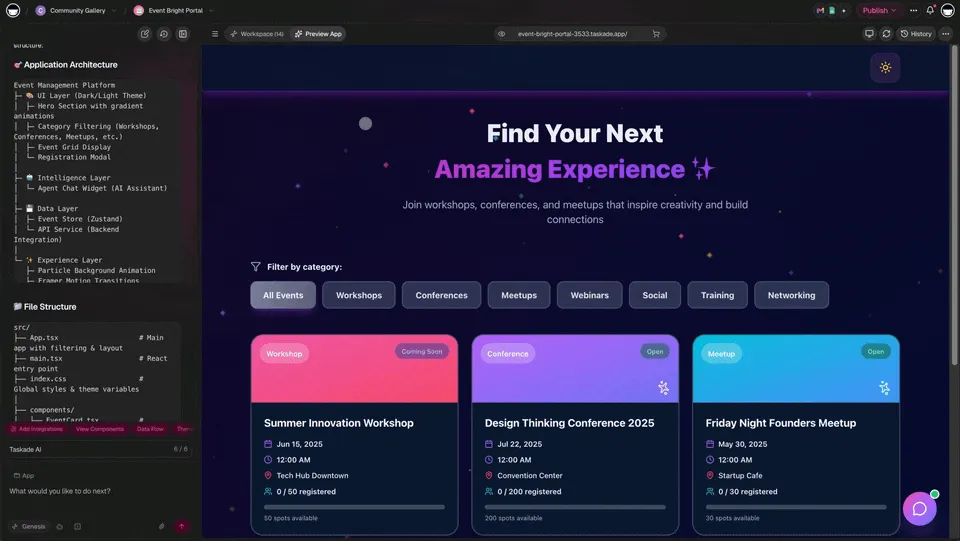
Step 3: Watch Genesis Build
Genesis creates your agent with three layers aligned to Workspace DNA:
Memory (Projects): A database structure for knowledge base articles, conversation history, support tickets, and user profiles.
Intelligence (Agents): An AI agent configured with your specified personality, access to the knowledge base, ticket creation ability, and contextual memory.
Execution (Automations): Workflows for ticket creation, notification triggers, and status updates.
This entire process takes about 60 seconds. Read more about how Workspace DNA works.
Step 4: Add Knowledge
Your agent needs information to be helpful. Go to the Knowledge Base section and add:
- Product information — features, pricing, plans
- Common questions — FAQs and answers
- Troubleshooting guides — step-by-step solutions
- Policies — refunds, support hours, SLAs
You can type directly into Projects, upload documents, connect external sources, or paste from existing docs. The agent uses multi-layer search (full-text + semantic) to find relevant answers across your entire knowledge base.
Step 5: Configure Agent Behavior
Click on the Agent to customize its personality, capabilities, and boundaries.
Personality: Adjust tone (professional vs. casual), detail level (detailed vs. concise), and formality (formal vs. friendly).
Capabilities: Enable or disable ticket creation, knowledge base access, user memory, email sending, and custom slash commands.
Boundaries: Set limits on topics to avoid, escalation triggers, and information the agent should never share.
| Configuration | Purpose | Example |
|---|---|---|
| System prompt | Define personality and role | "You are a senior support engineer..." |
| Knowledge sources | What the agent can reference | Product docs, FAQ, changelog |
| Tool access | What actions it can take | Create tickets, send emails |
| Escalation rules | When to involve humans | Billing disputes, legal questions |
| Memory scope | What it remembers | Per-user conversation history |
Learn more about Custom AI Agents.
Step 6: Test Your Agent
Before deploying, test thoroughly in the workspace:
- Open the chat interface
- Ask questions your customers would ask
- Try edge cases and adversarial inputs
- Verify ticket creation works correctly
Test these scenarios:
- "What is your pricing?" (factual accuracy)
- "How do I reset my password?" (troubleshooting flow)
- "I have a bug to report" (ticket creation)
- "Can I speak to a human?" (escalation handling)
- "Your product is terrible" (emotional de-escalation)
- Off-topic questions (boundary enforcement)
Iterate until every scenario returns the correct behavior. The agent learns from your corrections through persistent memory.
Step 7: Deploy to a Live URL
Your agent is ready. Click "Share" or "Publish" and choose your deployment mode:
Public URL: Anyone with the link can interact. Share with customers, embed on your website, or post on social media.
Embedded Widget: Add a chat bubble to every page of your site, integrate into your support section, or embed on a landing page.
Private Access: Restrict to specific users using the 7-tier permission system (Owner, Maintainer, Editor, Commenter, Collaborator, Participant, Viewer). You can also enable password protection or custom domains for Genesis apps.
Step 8: Connect Automations
Make your agent more powerful with automated workflows:
- New ticket -> Slack notification — Alert your team instantly when tickets are created
- Unresolved conversation -> Email escalation — Route to humans when the agent cannot help
- Positive feedback -> Thank you email — Automated follow-up for satisfied customers
- Daily summary -> Team report — Compile agent activity across all conversations
- SLA breach -> Priority alert — Escalate when response time exceeds thresholds
These automations connect to 100+ integrations including Slack, email, Google Calendar, Salesforce, HubSpot, and more.
Step 9: Monitor and Improve
Your agent is live. Now watch it learn and optimize over time.
Track conversations: See what users ask. Identify gaps in your knowledge base where the agent cannot provide answers.
Review tickets: Check what the agent could not resolve. Add that information to the knowledge base so it handles similar cases next time.
Analyze patterns: Find common issues, peak usage times, and satisfaction trends. Use the Support Rating Dashboard template to track metrics.
Iterate continuously: Add knowledge, adjust behavior, expand capabilities. The more data your agent accumulates in Projects, the smarter it becomes through Workspace DNA.
Taskade Genesis vs. Custom Hosting vs. Replit: Which Approach Is Right?
If you are evaluating where to host your AI agent, here is how the three main approaches compare.
| Feature | Taskade Genesis | Custom Hosting (AWS/GCP) | Replit Agent |
|---|---|---|---|
| Setup time | 10 minutes | Days to weeks | Hours |
| Code required | None | Full stack | Some |
| Persistent memory | Built-in | Build from scratch | Manual |
| Built-in tools | 34 tools | None (build your own) | Limited |
| Integrations | 100+ | Custom API work | Limited |
| Multi-agent collaboration | Native | Complex orchestration | Not supported |
| Custom domains | Yes | Yes (manual DNS) | Limited |
| Authentication | Built-in (OIDC/SSO) | Build from scratch | Basic |
| Automations | Visual builder | Code-based | Not included |
| Project views | 7 views (List, Board, Calendar, Table, Mind Map, Gantt, Org Chart) | N/A | N/A |
| Pricing | Free-$25/month | $50-500+/month | $20-100/month |
When custom hosting makes sense: You need full control over model selection, have unique latency requirements, or are building agents that integrate deeply with proprietary systems at enterprise scale.
When Taskade Genesis is the better choice: You want a working agent today, not next month. You need persistent memory, automations, integrations, and team collaboration without managing infrastructure.
Advanced: Multi-Agent Teams
Once you have deployed your first agent, the next step is building agent teams where multiple agents collaborate on complex workflows.
Each agent in the team has its own persistent memory, tool access, and personality — but they share the workspace context through Projects. The support agent triages incoming messages and delegates to specialized agents based on the query type.
Learn more about multi-agent workflows and how AI agents collaborate in Taskade.
Example: Live Support Agent Template
Here is what a finished support agent looks like in production:
Clone Support Rating Dashboard ->
This template includes a pre-configured agent, ticket database, satisfaction tracking, and reporting dashboard. Clone it and customize for your specific product.
More agent templates to explore:
- Customer onboarding agent — Guide new users through setup
- Sales qualification agent — Score and route inbound leads
- Research assistant agent — Summarize documents and extract insights
Common Mistakes to Avoid When Hosting Your First Agent
| Mistake | Why It Fails | Fix |
|---|---|---|
| Vague system prompt | Agent gives generic, unhelpful answers | Be specific about role, tone, and boundaries |
| No knowledge base | Agent hallucinates answers | Upload product docs, FAQs, and policies first |
| Skipping edge case testing | Agent breaks on unexpected inputs | Test adversarial and off-topic scenarios |
| No escalation path | Users get stuck in loops | Define clear human handoff triggers |
| Ignoring conversation logs | Agent never improves | Review weekly, update knowledge base |
What to Build Next
Your first agent is deployed. Here is your roadmap for expansion:
Expand capabilities: Add more knowledge sources, connect additional integrations, and build agent teams using multi-agent collaboration.
Create more agents: Deploy a sales qualification agent, onboarding assistant, or research helper.
Learn the architecture:
- Workspace DNA Guide — Understand Memory + Intelligence + Execution
- AI Agents Deep Dive — Customize agent behavior
- Automation Patterns — Connect agents to workflows
Resources
Get started:
- Create Your First App — Official tutorial
- Community Templates — Clone and customize agent workspaces
- AI Agent Builder — Create intelligent assistants
Learn more:
- What Is an Agent Hosting Platform?
- Chatbots Are Demos. Agents Are Execution.
- How Workspace DNA Works
- 10 Agentic Workflows for Startups
- What Is Agentic Engineering?
Explore Taskade AI:
- AI Agent Builder — Create intelligent assistants
- AI Agent Hosting — Deploy agents 24/7
- AI App Builder — Build complete applications
- AI Workflow Automation — Automate any process
Build with Genesis:
- Browse All Generator Templates — Apps, dashboards, websites, and more
- Browse Agent Templates — AI agents for every use case
- Explore Community Apps — Clone and customize
Frequently Asked Questions
How long does it take to create and deploy an AI agent with Taskade Genesis?
About 10 minutes. You describe your agent in plain language, Genesis builds the scaffolding automatically, then you add knowledge, configure behavior, test, and deploy. No coding is required — the entire process from prompt to live deployment is handled through Taskade's visual interface.
Do I need coding skills to host an AI agent on Taskade?
No. Taskade Genesis is a no-code AI agent builder. You describe what you want in natural language, and the platform generates a fully functional agent with persistent memory, 34 built-in tools, and custom slash commands. You can deploy it to a shareable public URL without writing a single line of code.
What can a Taskade AI agent do once it is deployed?
A deployed Taskade AI agent can answer questions from your knowledge base, remember conversation history with persistent memory, create tasks and support tickets, trigger automations with branching and looping logic, and run 24/7 on a shareable URL. Agents are powered by 15+ frontier AI models from OpenAI, Anthropic, and Google, and can collaborate with other agents in multi-agent workflows.
Can I connect my AI agent to automations and other workflows?
Yes. After deploying your agent, you can connect it to Taskade automations powered by a durable execution engine. Agents can trigger workflows that branch, loop, and filter across your workspace — updating projects across 7 views (List, Board, Calendar, Table, Mind Map, Gantt, Org Chart), notifying team members, and coordinating with other agents automatically.
How does Taskade Genesis compare to custom agent hosting on Replit or AWS?
Custom hosting on Replit, AWS, or Railway requires writing backend code, managing servers, handling authentication, and maintaining uptime. Taskade Genesis eliminates all of that — you describe your agent in plain language, deploy to a shareable URL, and get persistent memory, 34 built-in tools, and 100+ integrations out of the box. No infrastructure management required.
What AI models power Taskade agents?
Taskade agents are powered by 15+ frontier models from OpenAI, Anthropic, and Google. The platform handles model selection and routing automatically, so you get the best available intelligence without managing API keys or model versions.
Can multiple AI agents collaborate in a single workspace?
Yes. Taskade supports multi-agent collaboration where agents can delegate tasks to one another, share persistent memory through Projects, and coordinate through automations. You can build entire agent teams — for example, a support agent that escalates to a billing agent, which then triggers a retention agent.
How much does it cost to host an AI agent on Taskade?
Taskade offers a Free tier to get started. Paid plans start at $6/month (Starter) for up to 3 seats, $10/month (Pro) for up to 10 seats, and $25/month (Business) for unlimited seats. All paid plans include AI agent hosting, persistent memory, automations, and 100+ integrations.
Can I embed my AI agent on my own website?
Yes. After deploying your agent, you can share it via a public URL, embed it as a chat widget on your website, or restrict access to specific users using the 7-tier permission system (Owner, Maintainer, Editor, Commenter, Collaborator, Participant, Viewer). Custom domains and password protection are also available for Genesis apps.
What is Workspace DNA and how does it relate to AI agents?
Workspace DNA is Taskade's self-reinforcing architecture where Memory (Projects) feeds Intelligence (Agents), Intelligence triggers Execution (Automations), and Execution creates Memory. When you deploy an AI agent, it automatically gains access to your workspace's persistent memory and can trigger automations — creating a living system, not just a chatbot.