# Beginner's Guide to Taskade (2026): Tutorial From Sign Up to Live App
> A step-by-step Taskade tutorial for beginners: sign up, find your way around the workspace, build a project, ask Taskade EVE, make an app, add an agent and an automation, and publish.
- Source: https://www.taskade.com/blog/beginners-guide-to-taskade
- Published: 2022-01-19
- Updated: 2026-11-07
- Author: John Xie

**To use Taskade as a beginner, sign up, open the workspace that Taskade makes for you, and create one project. Then ask Taskade EVE to help, build or clone one Taskade Genesis app, train one AI agent, add one automation, and click Publish.** This tutorial walks through each step with the exact button names from the current app. It also shows which steps work on the Free plan and which need Pro.
We first published this beginner's guide to Taskade in January 2022, when a "project" meant an outline, a board and a chat window. The product has changed a lot since then. Folders are now apps, Taskade EVE builds whole apps from a chat, and a project can be the database behind a live website. This 2026 rewrite keeps the parts of the old guide that are still true and replaces the rest.
> **TL;DR:** Sign up at [taskade.com/signup](https://www.taskade.com/signup) and Taskade makes your workspace. Build one project, ask Taskade EVE for help, then build or clone a [Taskade Genesis](https://www.taskade.com/create) app, add one agent and one automation, and click **Publish**. Free gives you 2 members, 3 apps, 1 agent and 10 automation runs, with 0 starting AI credits. Pro is $10/month billed annually.
---
## Quick Answer: How Do You Use Taskade as a Beginner?
**You use Taskade in nine short steps, and the first working result takes about 30 to 60 minutes.** Each step adds one layer: a place to store data, an assistant that reads it, an app that shows it, and a public link that others can open. The table below is the whole tutorial on one screen.
*Facts checked on 2026-11-07 against the [Learn Taskade](https://www.taskade.com/learn) help center and the [pricing page](https://www.taskade.com/pricing).*
| Step | What you do | Where you click | Time | Plan |
| --- | --- | --- | --- | --- |
| 1 | Create your account | **Sign up with Google**, **Sign up with Apple**, or email | 2 min | Free |
| 2 | Learn the workspace layout | Icon rail, Taskade EVE panel, sidebar, work area | 5 min | Free |
| 3 | Create your first project | ➕ **New project** | 5 min | Free |
| 4 | Ask Taskade EVE for help | Taskade EVE chat panel | 5 min | Needs AI credits |
| 5 | Build or clone a Taskade Genesis app | Prompt box, or **Clone to Workspace** on a kit | 10 min | Free for a free kit with no automations and at most 1 agent. A prompt build needs AI credits |
| 6 | Train one AI agent | **AI Agents** in the sidebar | 10 min | Free includes 1 agent |
| 7 | Add one automation | **Automations**, or **Automate** in a project | 5 min | Free includes 10 runs per billing period |
| 8 | Publish the app | **Publish** in the top right | 5 min | Free. A password needs Pro |
| 9 | Invite your team | **Settings → Members**, or **Share** | 3 min | Free includes 2 members |
If you only have five minutes, do steps 1, 3 and 5. You will have an account, a project and a live app that you can open on your phone.
---
## What Is Taskade Used For?
**Taskade is used to plan work, keep notes and data, and build AI apps in one workspace.** Projects hold tasks and records, AI agents read that data and act on it, and automations run the repeat work. [Taskade Genesis](https://www.taskade.com/create) turns a plain-English prompt into a live app that runs on those three parts.
Teams use Taskade for to-do lists, meeting notes, content calendars, client portals, small CRMs, booking tools and internal dashboards. One person can use it as a personal planner. A ten-person agency can run client work, intake forms and weekly reports from it. The same building blocks serve both cases.
Taskade calls the three parts **Workspace DNA**:
- **Memory (▲):** [projects and databases](https://www.taskade.com/learn/projects/databases) store your tasks, notes, files and records.
- **Intelligence (■):** [custom AI agents](https://www.taskade.com/learn/agents/custom-agents) read that memory, answer questions and make decisions.
- **Execution (●):** [automations](https://www.taskade.com/learn/automation/automations-execution) run triggers and actions across 100+ integrations.
A Taskade Genesis app is the **interface** on top. It is the set of pages, forms and dashboards that your users see. Every result an automation produces goes back into a project, so the agent sees it on the next run.
```mermaid
graph TD
U[You or your users
type, submit, click]:::ui
M[▲ Memory
Projects and databases]:::mem
I[■ Intelligence
Custom AI agents]:::intel
E[● Execution
Automations]:::exec
A[Taskade Genesis app
pages, forms, dashboards]:::app
EVE[Taskade EVE
builds and edits all of it]:::eve
U --> A
A --> M
M --> I
I --> E
E --> R[Results written back
to your projects]:::mem
EVE --> A
EVE --> M
EVE --> I
EVE --> E
classDef ui fill:#1e1e2e,color:#94a3b8,stroke:#475569
classDef mem fill:#0d1b2a,color:#7dd3fc,stroke:#38bdf8,stroke-width:1.5px
classDef intel fill:#2a1225,color:#ff8fa3,stroke:#ff2d60,stroke-width:2px
classDef exec fill:#0d1a0e,color:#86efac,stroke:#22c55e,stroke-width:1.5px
classDef app fill:#1a140a,color:#ffb74d,stroke:#e65100,stroke-width:1.5px
classDef eve fill:#1a0d24,color:#ce93d8,stroke:#6a1b9a,stroke-width:1.5px
```
Watch the loop in three minutes before you start:
[How Taskade Works: Projects, Agents, Automations and Apps in One Loop](https://www.youtube.com/embed/D7Y-eKg8Mto?rel=0)
| What you want to do | What you use in Taskade | First step in this tutorial |
| --- | --- | --- |
| Keep a to-do list or plan a project | A project in List or Board view | Step 3 |
| Store records, such as clients or orders | A project in Table view with custom fields | Step 3 |
| Get answers and drafts from AI | Taskade EVE, or the AI chat in a project | Step 4 |
| Build a client portal, tracker or booking tool | A Taskade Genesis app | Step 5 |
| Answer the same questions every day | A custom AI agent with knowledge | Step 6 |
| Stop doing the same steps by hand | An automation with a trigger and actions | Step 7 |
| Give people a link to use your tool | **Publish** on the app | Step 8 |
| Work with your team in real time | Members, roles and project chat | Step 9 |
---
## What Changed Since the 2022 Version of This Guide?
**The biggest change is that Taskade now builds apps, not only lists.** In 2022 you learned Workspaces, Folders and Projects and then switched views by hand. In 2026 you can describe the outcome to Taskade EVE, and Taskade Genesis builds the projects, the agent, the automation and the app UI together.
The core ideas of the old guide still hold. A project is still a canvas for tasks and notes. You still indent with **Tab** and outdent with **Shift + Tab**. Every project still has its own chat. The names and the starting point moved, so use this table to translate an old tutorial into the current app.
| In the 2022 guide | In Taskade today | Learn more |
| --- | --- | --- |
| Folders and Teams inside a workspace | **Apps**. Teams, Folders and Subspaces are now called apps, and each app has a **Preview** tab | [Hierarchy Structure](https://www.taskade.com/learn/projects/hierarchy-structure) |
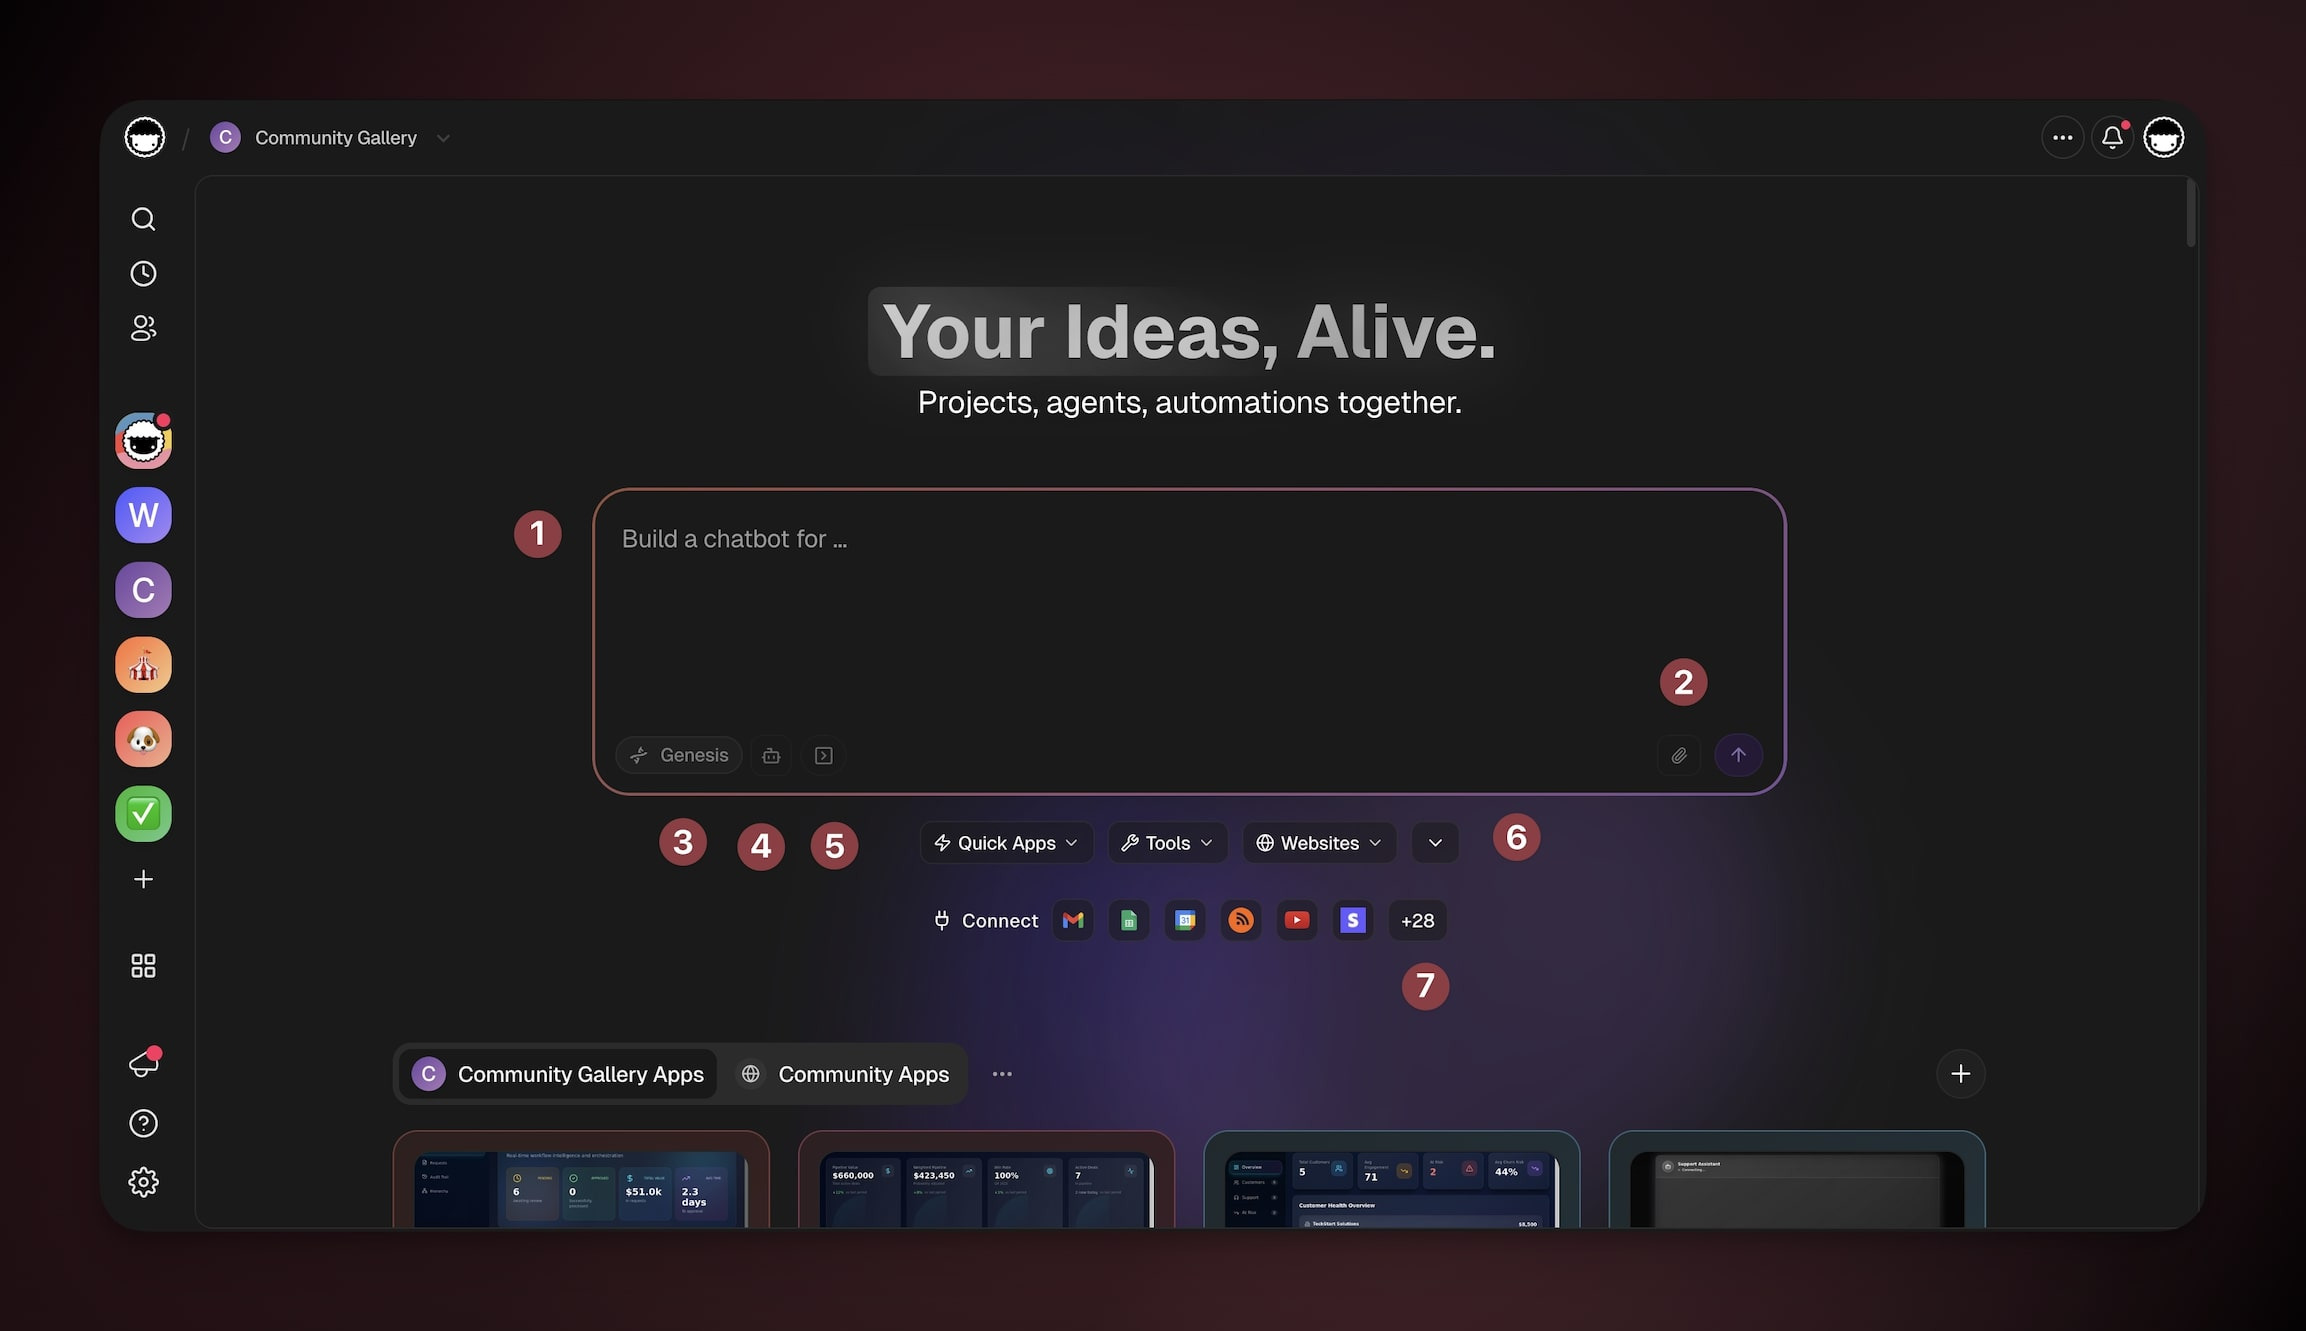
| A blank workspace view with a top menu | A workspace home with a **prompt box** in the center | [Workspace Layout Tour](https://www.taskade.com/learn/projects/ui-guide) |
| "Action view" for action items | **Table** for data, and **Actionsheet** under **More Views** (paid plans) | [Project Views](https://www.taskade.com/learn/projects/project-views) |
| Switch List, Board and Mind Map by hand | The same switch, plus Taskade EVE can build the right view for you | [Project Views](https://www.taskade.com/learn/projects/project-views) |
| Search the Help Center for answers | Ask Taskade EVE inside the workspace | [Taskade EVE](https://www.taskade.com/learn/agents/eve-assistant) |
| No AI agents | Custom AI agents with knowledge, tools and a public link | [Custom AI Agents](https://www.taskade.com/learn/agents/custom-agents) |
| No automations | Automations with triggers and actions across 100+ integrations | [Automations](https://www.taskade.com/learn/automation/automations-execution) |
| Share a project link | Share a project, or **Publish** a whole app to its own web address | [Publishing](https://www.taskade.com/learn/genesis/publishing) |
> **Note:** The 2022 guide showed a "Roadmap" tab and an "Action View." Neither name is in the current app. If an older video shows a menu that you cannot find, open the [Workspace Layout Tour](https://www.taskade.com/learn/projects/ui-guide) for the current location.
---
## Before You Start: What Is Free and What Needs a Plan
**You can do every step of this tutorial on the Free plan except a prompt build with Taskade EVE, because a new Free account starts with 0 AI credits.** Free has no time limit and needs no card. It includes unlimited projects, 2 workspace members, 3 Taskade Genesis apps, 1 AI agent and 10 automation runs per billing period.
This is the one fact that most beginner tutorials leave out. If your Free account never had AI credits, Taskade EVE shows **Pick a plan to start building** when you send your first prompt. Your projects, views, sharing and publishing still work. You have two ways forward:
1. **Clone a free app kit** from the [Taskade App Factory](https://www.taskade.com/apps). On Free, pick a free kit with no automations and at most 1 AI agent, because Free cannot import a kit that holds automations. The copy is yours to change. This tutorial shows how in Step 5.
2. **Upgrade to Pro** for a monthly credit allowance, and build from a prompt.
On Free, you earn free AI credits with referrals and invites, and you can upgrade any time. Open **Earn credits** in **Settings** to see how. See [Referrals](https://www.taskade.com/learn/account/referrals).
```mermaid
graph TD
S[New Free account
0 AI credits]:::start
Q{What do you want
to do first?}:::ask
P[Projects, views,
sharing, chat]:::ok
K[Clone a free app kit
no automations, 1 agent max]:::ok
B[Build an app
from a prompt]:::need
C[Earn credits with
referrals and invites]:::earn
U[Upgrade to Pro
monthly credits]:::earn
S --> Q
Q -->|Organize work| P
Q -->|Get a working app now| K
Q -->|Describe a new app| B
B --> C
B --> U
classDef start fill:#1e1e2e,color:#cdd6f4,stroke:#475569
classDef ask fill:#2a1225,color:#ff8fa3,stroke:#ff2d60,stroke-width:2px
classDef ok fill:#0d1a0e,color:#86efac,stroke:#22c55e,stroke-width:1.5px
classDef need fill:#1a140a,color:#ffb74d,stroke:#e65100,stroke-width:1.5px
classDef earn fill:#0d1b2a,color:#7dd3fc,stroke:#38bdf8,stroke-width:1.5px
```
*Free plan limits checked on 2026-11-07 against [Is Taskade Free?](https://www.taskade.com/learn/account/free-plan).*
| What you get | Free plan | What it means for this tutorial |
| --- | --- | --- |
| Price | $0, no time limit, no card | You can follow every step without paying |
| Workspaces | 1 | Do the whole tutorial in the workspace that Taskade makes |
| Workspace members | 2 | You and one teammate |
| Projects and tasks | Unlimited | Make as many practice projects as you like |
| Taskade Genesis apps | 3 per workspace | A cloned kit counts as one app |
| AI agents | 1, with 1 knowledge source | Step 6 uses your one agent. A kit with an agent uses it too |
| Automation runs | 10 per billing period | Enough to test Step 7 a few times |
| AI credits | None at signup | A prompt build in Step 5 needs credits or a plan |
| Project views | All except Gantt Chart, Actionsheet and Org Chart | List, Board, Table, Mind Map, Calendar and Docs (Beta) work |
| Integrations in automations | Standard steps plus HTTP Request, RSS, Pushover and MCP Client | Premium integrations such as Slack, Gmail and Notion need a paid plan |
| App sign-in for app users | Yes | **Each person signs in** works on Free |
**What you need before Step 1:**
- An email address that you check, or a Google or Apple account. A temporary inbox does not work.
- A modern browser on a computer. The phone apps work too, but the app builder is easier on a larger screen.
- One small, real job to build around. "Track my freelance clients" teaches more than "test app."
---
## Step 1: Create Your Taskade Account
**Open [taskade.com/signup](https://www.taskade.com/signup), pick Google, Apple, single sign-on or email, and Taskade makes your workspace for you.** There are no setup screens. Sign-up takes about two minutes and needs no credit card.
| Option | Pick it when | What happens next |
| --- | --- | --- |
| **Sign up with Google** | You use a Google account for email | Follow the Google screens, and your workspace opens |
| **Sign up with Apple** | You use an Apple ID | Follow the Apple screens, and your workspace opens |
| **Sign up with Single Sign-On** | Your company set up single sign-on for Taskade | Your company login opens. Single sign-on is a Business plan and up feature |
| Email and password | You want a separate Taskade login | Type a password of at least 12 characters, then click the link in the email |
**If you sign up with email:**
1. Type your email address in the **Email** field.
2. Type a password of 12 to 128 characters in the **Password** field. Taskade does not ask for capital letters, numbers or symbols, so a passphrase of four or five ordinary words works well.
3. Wait until the meter under the field says **Looks good**, then click **Sign up**.
4. Open the email from **Taskade Team**, sent from `updates@taskade.com`, and click the link to verify your address.
**What you see next:** your workspace home. Taskade names it after your first name, for example "Alex's Workspace," or "My Workspace" if it does not know your name yet. A prompt box sits in the center. If a small welcome video card opens in a corner, watch it or click **Skip**.
**Change your username later:** Taskade makes your first username from the part of your email before the `@`. To change it, open **Settings → Account**, type a new name in the **Username** field, and click **Update**. Your username is also your public profile address, for example `taskade.com/@yourname`.
> **Tip:** If the Taskade email does not arrive, look in your spam or junk folder and add `updates@taskade.com` to your contacts. Full steps are in [Create Your Taskade Account](https://www.taskade.com/learn/account/create-account).
You are done with Step 1 when you see your workspace home and your username shows in **Settings → Account**.
---
## Step 2: Find Your Way Around the Workspace
**The Taskade workspace has four areas: the icon rail on the far left, the Taskade EVE chat panel, the in-space sidebar, and the work area.** Breadcrumbs at the top show where you are. Every area follows your role, so a Viewer sees fewer controls than an Owner.
```text
┌───────────────────────────────────────────────────────────────┐
│ Taskade › My Workspace › Launch Plan │
├──────────┬─────────────┬────────────────┬─────────────────────┤
│ RAIL │ TASKADE EVE │ IN-SPACE │ WORK AREA │
│ Search │ the AI chat │ › Projects │ [Workspace|Preview] │
│ Recent │ │ › AI Agents │ │
│ Shared │ Mode ▾ │ › Automations │ List Board Table │
│ Memory │ │ › Integrations │ Mind Map │
│ │ │ › Media │ More Views ▾ │
│ Help │ │ │ your content │
│ Settings │ │ │ │
└──────────┴─────────────┴────────────────┴─────────────────────┘
```
| Area | What it holds | When a beginner uses it |
| --- | --- | --- |
| **Icon rail** | Search, recent work, shared items, Memory, Help and Settings | To find a project fast, or to open **Settings** |
| **Taskade EVE panel** | Your AI chat. The mode menu points it at one layer of your app | To ask for a project, an app, an agent or an automation |
| **In-space sidebar** | Projects, AI Agents, Automations, Integrations and Media for the current space | To open the thing you want to edit |
| **Work area** | The app preview, or your content in multiple project views | To do the actual work |
| **Breadcrumbs** | Taskade logo, workspace name, current app, and the space menu | To switch workspaces or apps from the drop-downs |
### How Taskade organizes your work
**Taskade nests your work in four levels: workspace, app, project and task.** The workspace holds billing and members. An app (the name for what used to be a Team, Folder or Subspace) groups related projects, agents and automations, and it has a **Preview** tab for its interface. A project holds the content. A task is the smallest unit that agents and automations read and write.
```mermaid
graph TD
W[Workspace
billing and members]:::ws
A1[App
formerly a Team or Folder]:::app
A2[App
its own Preview tab]:::app
P1[Project
List, Board, Table]:::proj
P2[Project
Mind Map, Calendar]:::proj
AG[AI agent
reads projects]:::intel
AU[Automation
writes to projects]:::exec
T[Task and subtask
the smallest unit]:::task
W --> A1
W --> A2
A1 --> P1
A1 --> P2
A1 --> AG
A1 --> AU
P1 --> T
classDef ws fill:#2a1225,color:#ff8fa3,stroke:#ff2d60,stroke-width:2px
classDef app fill:#1a140a,color:#ffb74d,stroke:#e65100,stroke-width:1.5px
classDef proj fill:#0d1b2a,color:#7dd3fc,stroke:#38bdf8,stroke-width:1.5px
classDef intel fill:#1a0d24,color:#ce93d8,stroke:#6a1b9a,stroke-width:1.5px
classDef exec fill:#0d1a0e,color:#86efac,stroke:#22c55e,stroke-width:1.5px
classDef task fill:#1e1e2e,color:#94a3b8,stroke:#475569
```
Each level inherits settings from the level above, and you can override a role at any level. A new workspace opens to the **Create** screen with the prompt box. If your workspace already holds projects, the Create screen shows **Open my projects** under the prompt box. To always open on your project list, click the **arrow** next to the workspace name, choose **Edit**, and set **Opens to** on the **General** tab.
> **Tip:** Each workspace is billed separately, and Free includes 1 workspace. Use apps inside one workspace to separate clients or departments before you create a second workspace.
---
## Step 3: Create Your First Project and Pick a View
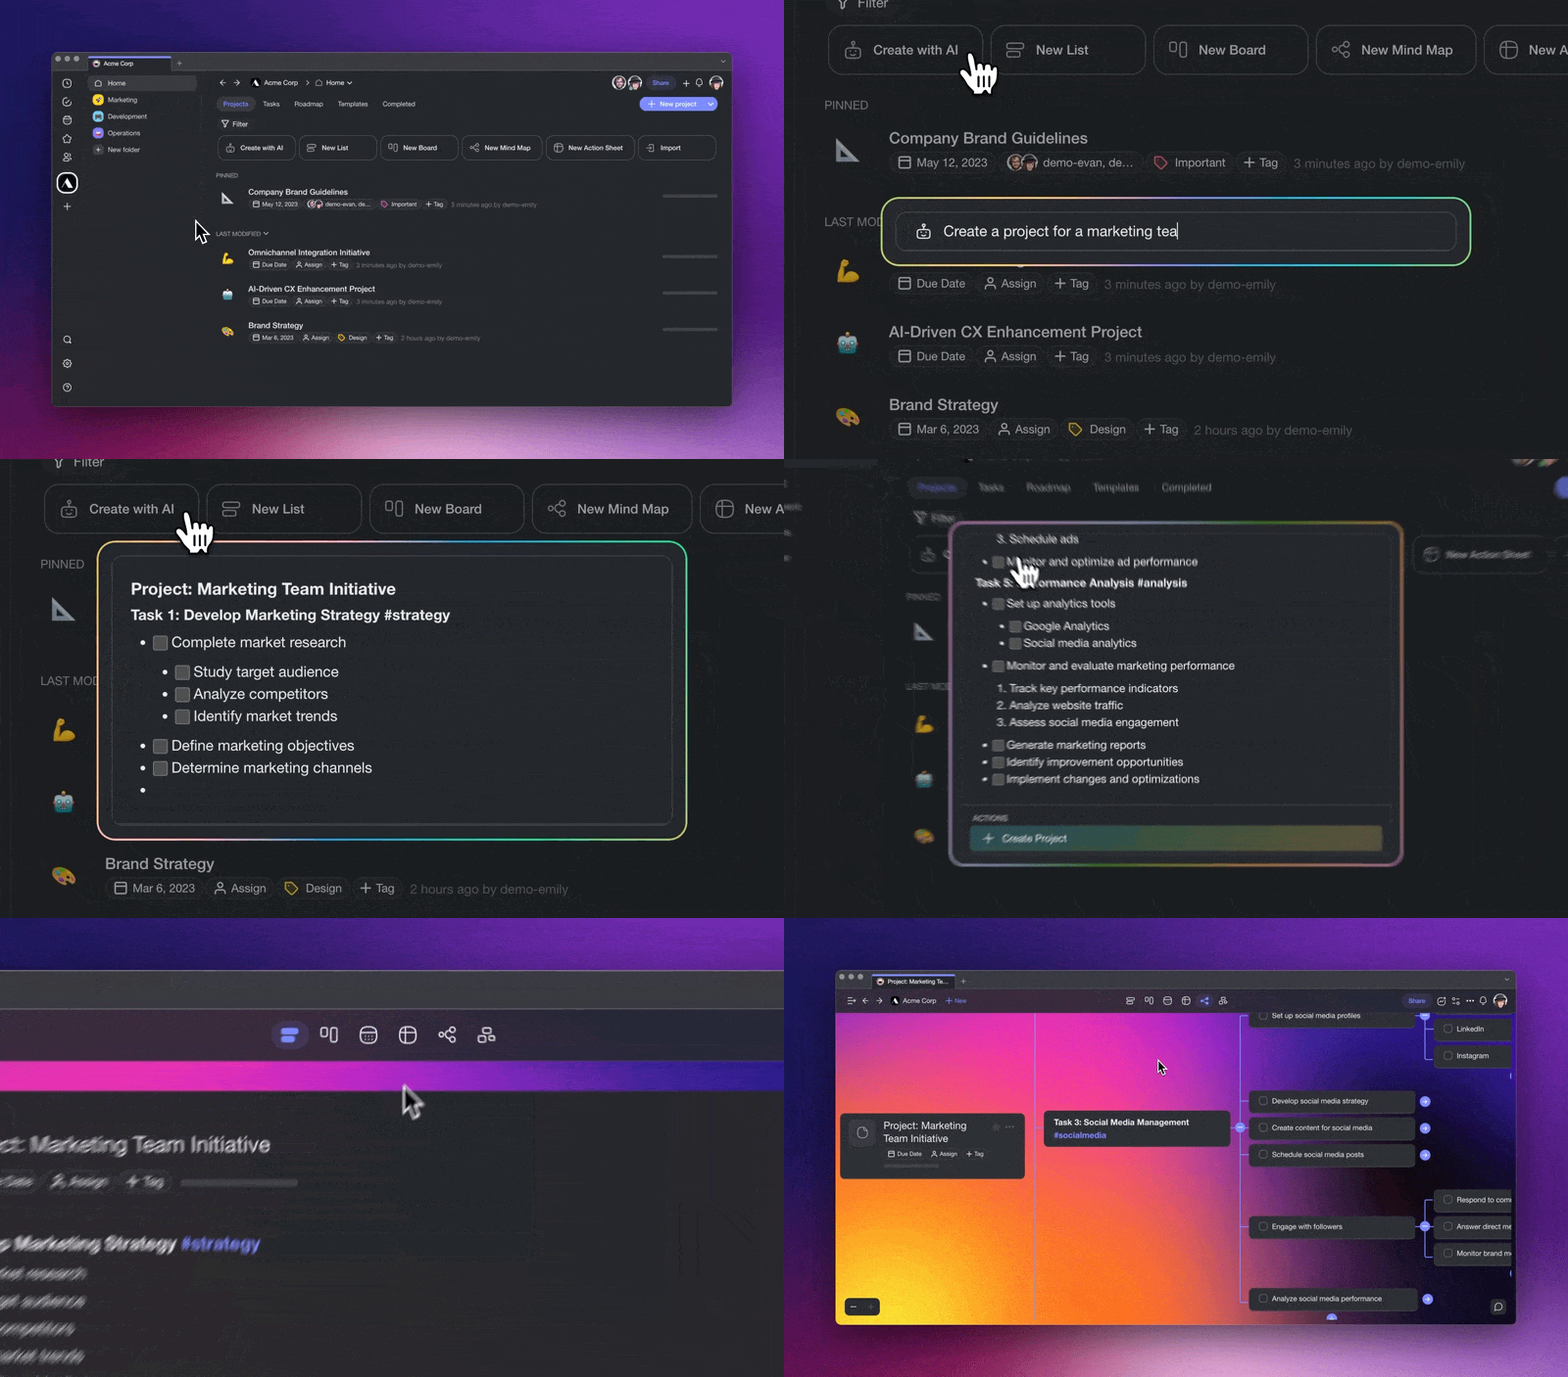
**A project is a page for tasks, notes and data, and you can show the same project as a list, a board, a table, a mind map and more without copying anything.** Click ➕ **New project**, start blank, from a template or with the AI Generator, and every new project opens in List view.
| Way to start | Click | Best for |
| --- | --- | --- |
| Blank project | ➕ **New project**, then add your first task | Learning the editor by hand |
| Template | ➕ **New project**, then pick a [template](https://www.taskade.com/learn/projects/use-templates) | A proven structure, such as a weekly planner |
| AI Generator | ➕ **New project**, then 🤖 **AI Generator**, describe it, and click ➕ **Create Project** | A full project from one sentence. Uses AI credits |
**Do this now:**
1. Open your workspace and click ➕ **New project** in the top right.
2. Start blank, and type a title such as "Client Onboarding."
3. Type one task per line: "Send welcome email," "Book kickoff call," "Share project folder."
4. Press **Tab** on a line to indent it under the line above. Press **Shift + Tab** to outdent.
5. Switch the view at the top of the project from **List** to **Board**, then to **Table**.
### Which project view should a beginner use?
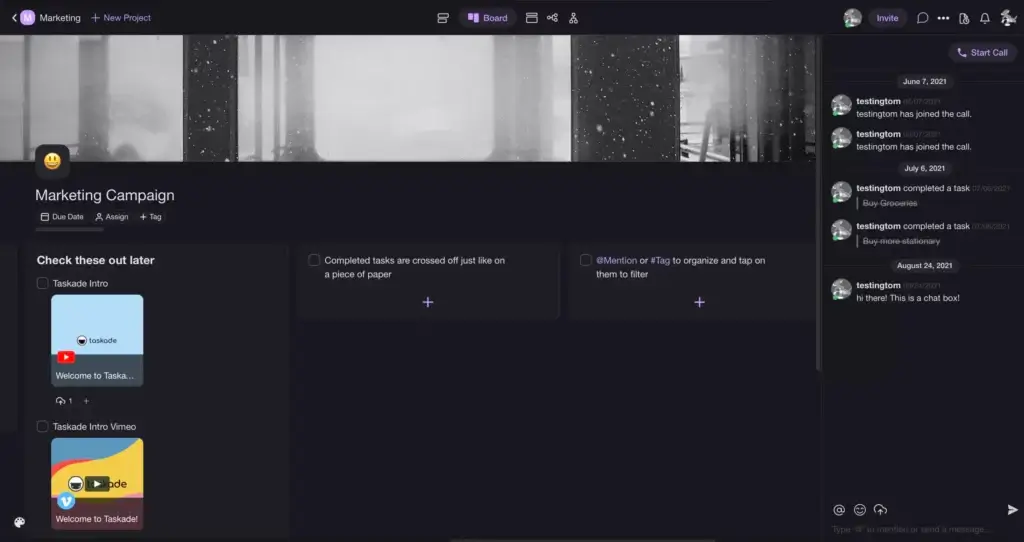
**Start with List view to write, Board view to track progress, and Table view to store records.** All views show the same data, so switching never duplicates work. Four views sit as tabs on the toolbar, and the rest sit under **More Views**.
| View | Best for | Where | Plan |
| --- | --- | --- | --- |
| [List](https://www.taskade.com/learn/projects/list-view) | Outlines, notes, checklists and daily to-dos | Toolbar tab | Every plan |
| [Board](https://www.taskade.com/learn/projects/board-view) | Kanban pipelines, content stages, sales stages | Toolbar tab | Every plan |
| [Table](https://www.taskade.com/learn/projects/table-view) | Databases, CRMs and anything with fields | Toolbar tab | Every plan |
| [Mind Map](https://www.taskade.com/learn/projects/mindmap-view) | Brainstorming and strategy | Toolbar tab | Every plan |
| Docs (Beta) | Long-form docs and specs | More Views | Every plan |
| [Calendar](https://www.taskade.com/learn/projects/calendar-view) | Due dates, schedules and content calendars | More Views | Every plan |
| [Gantt Chart](https://www.taskade.com/learn/projects/gantt-view) | Dependencies and timelines. Timeline lives inside this view | More Views | Paid plans |
| [Actionsheet](https://www.taskade.com/learn/projects/actionsheet-view) | Spreadsheet-style action lists | More Views | Paid plans |
| [Org Chart](https://www.taskade.com/learn/projects/orgchart-view) | Team structures and decision trees | More Views | Paid plans |
### Add details to a task
Select a task and use its add-ons to give it more context. You can set a [due date](https://www.taskade.com/learn/projects/due-dates), [assign it](https://www.taskade.com/learn/projects/assign-task) to a teammate, leave a [comment](https://www.taskade.com/learn/projects/project-comments), upload a file or embed a video. In Table view, [custom fields](https://www.taskade.com/learn/projects/custom-fields) turn each task into a row with typed columns, such as status, owner and amount. That is how a simple project becomes a database that an agent or an app can read.
> **Tip from the 2022 guide that still works:** Turn a long list into an outline. Indent related tasks under a heading line, then fold the heading to hide the detail. In Mind Map view, the same outline becomes a tree that you can present in a meeting.
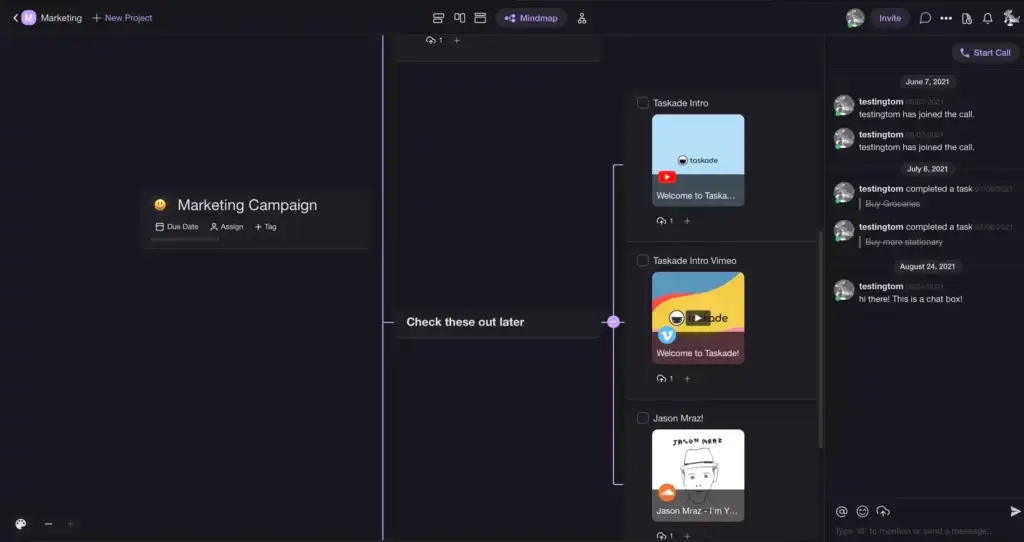
You are done with Step 3 when your project shows the same tasks in List, Board and Table view.
---
## Step 4: Ask Taskade EVE for Help
**Taskade EVE is the AI assistant at the center of your workspace, and it can create projects, build Taskade Genesis apps, set up agents and wire automations from a chat.** Type what you want in plain English. Taskade EVE sees your whole workspace, so it can find and change your existing projects, not only the newest one.
A custom AI agent is a specialist that you build for one job. Taskade EVE is the generalist that builds things for you. Read [Taskade EVE](https://www.taskade.com/learn/agents/eve-assistant) for the full list of what it can do.
| Mode | Best for | Example prompt |
| --- | --- | --- |
| **Auto** (default) | Building, editing and running everything from one prompt | "Add a customer feedback form with a summary of each entry." |
| **App** | Pages, layouts and the interface of your app | "Move the summary card to the top of the dashboard." |
| **Projects** | Tasks, content and workspace data | "Create a marketing campaign project with weekly milestones." |
| **AI Agents** | Agent prompts, tools and knowledge | "Create a support agent trained on our product docs." |
| **Automations** | Automations and their triggers | "When a form is submitted, send a notification to Slack." |
**Try these three prompts on your Step 3 project:**
1. "Add a Status field to Client Onboarding with To do, Doing and Done, and set every task to To do."
2. "Group Client Onboarding into three sections: Before the call, During the call, After the call."
3. "Write a short welcome email for a new client, and add it as a note under Send welcome email."
### Pick an AI model tier
Under the prompt box, the model selector picks how much reasoning Taskade EVE spends on a request. TSK-Auto is the default and picks the model for you. Taskade runs on frontier models from top AI labs, and deeper tiers use more credits per request.
| Tier | Best for | Plan |
| --- | --- | --- |
| **TSK-Auto** | Recommended for beginners. Taskade picks the model | Every plan |
| **TSK-Instant** | Quick edits and short answers, with the lowest credit use | Every plan |
| **TSK-Standard** | Everyday apps and drafting | Paid plans |
| **TSK-Thinking** | Bigger apps that need more care | Paid plans |
| **TSK-Reasoning** | Complex apps and hard problems | Business and up |
### Three features beginners miss
- **Voice input.** Leave the composer empty, click the mic, or press **Command/Ctrl + Shift + M**, and speak for up to one minute. Taskade puts the transcript in the composer and never sends it on its own.
- **Queued messages.** Type your next request while Taskade EVE is still working, and press **Enter**. It waits under **Up next** and sends in order.
- **Standing preferences.** Tell Taskade EVE to remember how you like answers, or edit **Taskade EVE memory** in **Settings → Account**. The preference follows your account across workspaces.
> **Note:** If your workspace has no AI credits, a queued message reads **Needs credits** and stays in the queue. On a Free account that never had credits, Taskade EVE shows **Pick a plan to start building**. See [Before You Start](#before-you-start-what-is-free-and-what-needs-a-plan).
---
## Step 5: Build Your First Taskade Genesis App
**Taskade Genesis builds a live app from one plain-English prompt: the projects that store the data, an AI agent, an automation and the pages that users see.** Type the prompt in the box on your workspace home, or at [taskade.com/create](https://www.taskade.com/create), and send it. A first build takes about 60 to 120 seconds.
[Taskade Genesis Tutorial: Build an AI App With Agents and Automations, No Code](https://www.youtube.com/embed/CCqBY4g8Ty4?rel=0)
### Write a prompt that names four things
**A good first prompt names the users, the data, the actions and the outcome.** A vague prompt gives a vague app. You do not need a perfect prompt, because you refine the app by chatting after the first build.
| Part of the prompt | Question it answers | Example |
| --- | --- | --- |
| Users | Who uses the app? | "Freelance clients submit requests, and I review them" |
| Data | Which fields does each record hold? | "Name, email, request type, budget, due date" |
| Actions | What happens on its own? | "When a request comes in, summarize it and add a task for me" |
| Outcome | What do people see? | "A request form for clients and a board of open requests for me" |
| Boundary | What should the build leave out for now? | "Do not add sign-in or a custom domain yet" |
**Vague prompt (do not use this pattern):**
> "Make a client app."
**Good prompt (use this pattern):**
```text
Build a client request tracker. Clients submit a request with their name,
email, request type (design, copy, other), budget, and due date. Store every
request in a Requests project. Show me a board of open requests grouped by
type. When a new request arrives, write a two-line summary and add a
follow-up task for me. Do not add sign-in or a custom domain yet.
```
Naming the fields gives each request a typed column from the first save. The last line keeps Taskade Genesis from adding sign-in before you decide that you want it. For more patterns, read [Writing your first prompt](https://www.taskade.com/learn/genesis/first-prompt) and [A Maker's Guide to AI Prompts](https://www.taskade.com/learn/genesis/prompt-guide).
### Send the prompt and watch the build
1. Click the paperclip icon if you want to attach a brand guide, a CSV or a screenshot as context.
2. Leave **Agent Mode** on. It is on by default, and it lets Taskade EVE plan and build the whole app.
3. Click the **Send** arrow, or press **Enter**.
4. Watch the **Plan** list mark each step and the **Built so far** list name each project, agent and automation as it lands.
5. Wait for the bar that reads, for example, **Client Request Tracker is ready**, with a **Publish** button.
```mermaid
sequenceDiagram
participant You
participant EVE as Taskade EVE
participant P as Projects
participant AG as AI agent
participant AU as Automation
participant UI as App pages
You->>EVE: Send the prompt
EVE->>P: Create the Requests project with typed fields
EVE->>AG: Add an agent that summarizes requests
EVE->>AU: Add a trigger on a new request
EVE->>UI: Build the form and the board
EVE-->>You: Client Request Tracker is ready
You->>UI: Submit a test request
UI->>P: Save the request
P->>AU: New request starts the automation
AU->>AG: Ask for a two-line summary
AU->>P: Add a follow-up task
```
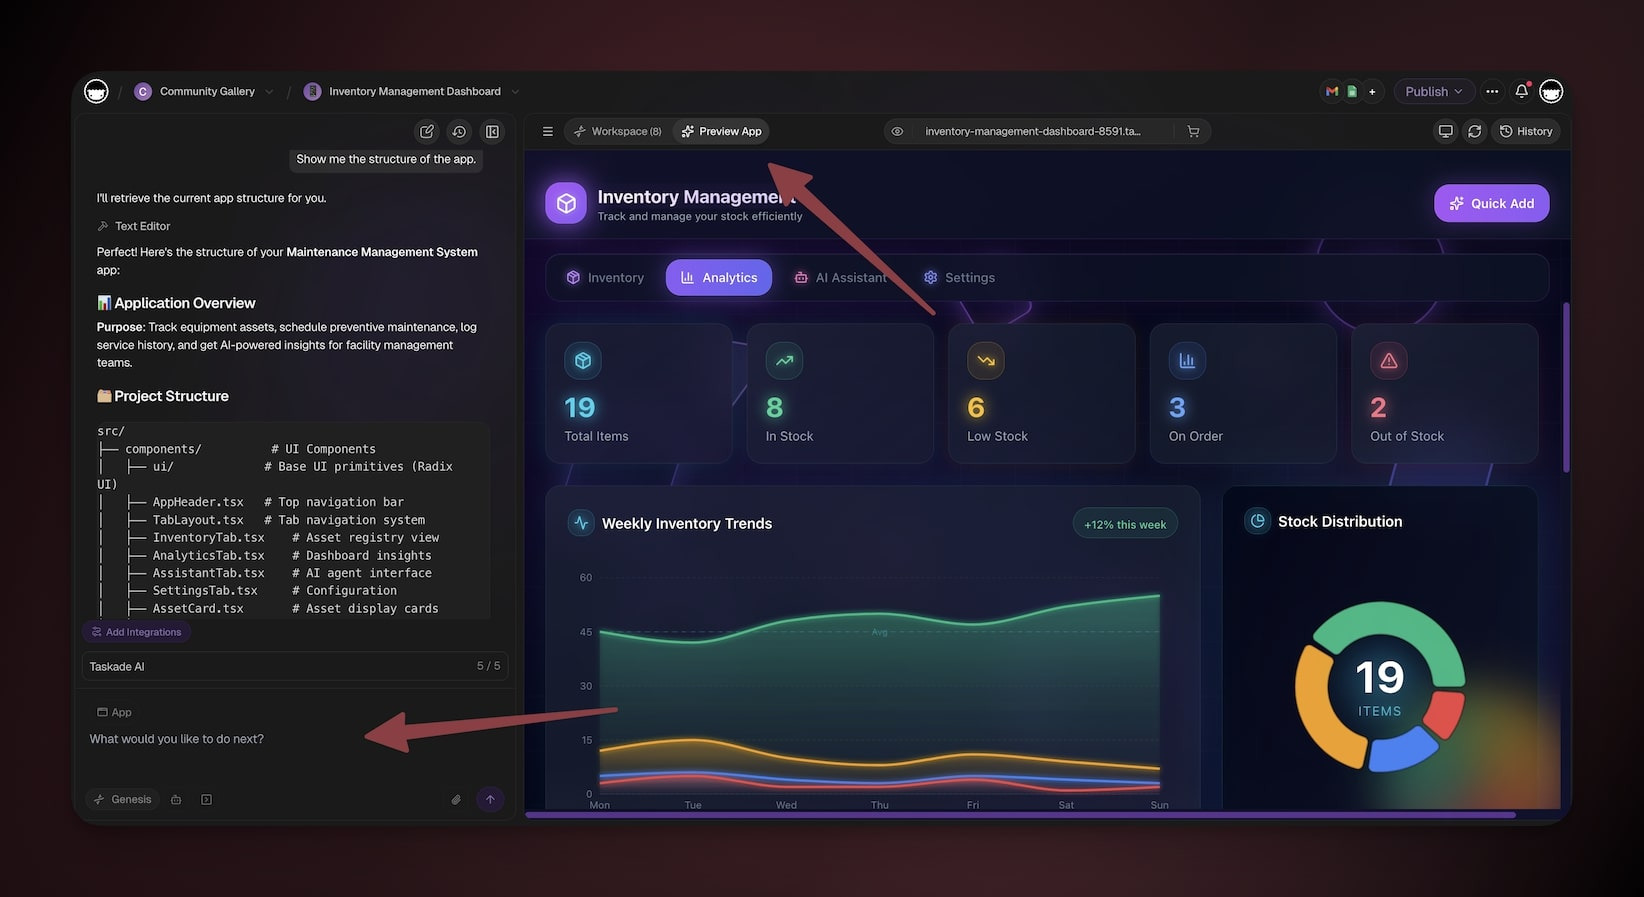
The first clean build of a new app goes live once at its own `your-app.taskade.app` address. That first version is unlisted, so it is not in public listings and search engines do not index it. If the app has a sign-in screen and you did not choose who can open it, the app stays a draft.
### Change the app by chat or by click
**Refine one change at a time, either in the Taskade EVE chat or with the Element Selector.** Both edit the same live app.
- **By chat:** type "Use our brand pink #ff2d60 as the main color" or "Add a confirmation message after a client submits a request."
- **By click:** in the app preview toolbar, click **Select element**, click a button, heading or card, and describe the change in the chat. Taskade shows "Element selected" first.
On a new app, Taskade saves each change as a draft. Visitors see it only after you click **Publish** again. Until then, the publish status reads **Changes not live yet**. You can roll back to an earlier version from the version history.
### On the Free plan? Clone a free app kit instead
**A free app kit gives a Free account a working app without AI credits.** The [Taskade App Factory](https://www.taskade.com/apps) lists apps that their makers share as kits. Open a kit page, check what it holds, and click **Clone to Workspace**. Taskade copies the projects, agents and automations into a workspace that you pick.
Before you clone on Free, read the counts on the kit page. Free blocks the import of a kit that holds automations, and a kit agent counts against your 1-agent limit. So pick a free kit with **no automations** and **at most 1 AI agent**. These two met that rule when we checked on 2026-11-07:
| Kit | What the kit page lists | Price | Why it fits Free |
| --- | --- | --- | --- |
| [Salon Scheduler](https://www.taskade.com/apps/all/salon-scheduler-rhiqco7dxhx74pde) | 5 projects, 1 AI agent, no automations | Free | One agent and no automations, so it clones on Free |
| [Color Code Studio](https://www.taskade.com/apps/all/color-code-studio-zpailee8nulqt0mn) | 1 project, 1 AI agent, no automations | Free | The smallest kit to learn how an app is wired |
A kit with automations, such as most business templates, needs a paid plan to clone. A cloned kit also counts as one of your 3 Free apps. After the clone, open the app's **Preview** tab, then open each project in the sidebar to see how the app stores its data. Read [Community Kits](https://www.taskade.com/learn/genesis/community-kits) for the full clone rules.
You are done with Step 5 when you can open your app, submit one test entry, and see that entry land in its project.
---
## Step 6: Train Your First AI Agent
**A custom AI agent is a reusable AI teammate for one job, built from instructions, knowledge, tools and a model.** Open **AI Agents** in the sidebar, write the instructions, add your projects and files as knowledge, turn on tools, then test it in **Messages**. Free includes 1 agent with 1 knowledge source.
| Part | What it does | Where to set it |
| --- | --- | --- |
| **Instructions** | The role, the rules and the reply style, typed in the **Prompt** field | **Knowledge** tab |
| **Model** | **Tone**, **Language** and **AI Model** | **Knowledge** tab |
| **Introduction** | The first message and the conversation starters | **Knowledge** tab |
| **Knowledge sources** | Projects, files, links, videos and pasted text | **Knowledge** tab |
| **Commands** | `/slash` shortcuts that run a saved prompt | **Actions** → **Commands** |
| **Tools** | What the agent can do: search, project actions, apps, automations | **Actions** → **Tools** |
| **Publish** | The public link, the embed code and the public look | **Publish** tab |
**Build it in five moves:**
1. Open **AI Agents** in your workspace sidebar. Pick **Generate** to describe the agent, **Templates** to start from a ready-made one, or **Create** to start blank.
2. On the **Knowledge** tab, type the role in the **Prompt** field under **Instructions**. Write it like a brief for a new teammate.
3. On the same tab, click **Add Project** and pick your Client Onboarding project. A project source syncs when the project changes.
4. Open the **Actions** tab. On **Tools**, turn on only what the job needs.
5. Open **Messages** and send three real questions from the job. If all three answers are correct, open **Publish**, turn on **Publish Agent**, and click **Copy link** next to **Agent Share Link**.
A good instruction sets a boundary, so the agent never invents an answer:
```text
You are the onboarding assistant for my design studio. Answer client
questions about our kickoff process, timelines, and what to prepare, using
the attached Client Onboarding project. Keep answers under 80 words. If the
answer is not in the project, say so and offer to pass the question to me.
```

An agent runs on frontier models from top AI labs, and TSK-Auto picks one for each request. Its tools include web search, project actions and file analysis, and it can start an automation. Taskade does not publish a fixed tool count, because the tool list loads from your connected apps. Read [Custom AI Agents](https://www.taskade.com/learn/agents/custom-agents) and [Agent Knowledge & Memory](https://www.taskade.com/learn/agents/knowledge) for the full setup. Compare agent builders in [What Are AI Agents?](https://www.taskade.com/blog/what-are-ai-agents) and [AI Agent Builders Explained](https://www.taskade.com/blog/agent-builders-explained).
You are done with Step 6 when the agent's share link opens in a private browser window and answers from your project.
---
## Step 7: Add Your First Automation
**An automation is a trigger plus one or more actions that run on their own, and it writes its results back into your projects.** Open **Automations** in the sidebar, or click **Automate** at the top of a project, pick a trigger, add actions, and turn the automation on. Automations run on every plan, Free included.
| Way to create it | Best for | How to start |
| --- | --- | --- |
| **Generate with AI** | Describing the workflow in plain English | Click **Create with AI**, describe the flow, pick a mode, then create it |
| **Ask Taskade EVE** | Setup from one sentence | "When a task is completed, send me a summary email" |
| **From a project** | An automation that already knows where to read and write | Open the project, click **Automate**, pick a trigger and an action |
| **Start from scratch** | Full control | Add a **Trigger**, then **Add Step** for each action |
| **From a template** | A proven flow to adjust | Pick a template tile, then change the trigger and actions |
**Build a first automation on your project:**
1. Open Client Onboarding and click **Automate** at the top. The project is added to the flow for you.
2. Pick the trigger **Task Completed**.
3. Add an action that asks your agent for a one-line update on the finished task.
4. Type **@** in the next field to insert the agent's reply, and add an action that writes it to a field or a new task.
5. Select the trigger. If its **Test Run** section shows **Test**, click it. If not, turn the automation on and complete one task.
6. Open the **Runs** tab and read the data that each step received.
```mermaid
graph TD
T[Trigger
Task Completed]:::trig
A1[Action
Ask the agent for an update]:::intel
B{Branch
Is the client waiting?}:::ask
A2[Action
Add a follow-up task]:::exec
A3[Action
Update a custom field]:::exec
M[Project
Client Onboarding]:::mem
T --> A1
A1 --> B
B -->|Yes| A2
B -->|No| A3
A2 --> M
A3 --> M
classDef trig fill:#1a140a,color:#ffb74d,stroke:#e65100,stroke-width:1.5px
classDef intel fill:#2a1225,color:#ff8fa3,stroke:#ff2d60,stroke-width:2px
classDef ask fill:#1e1e2e,color:#cdd6f4,stroke:#475569
classDef exec fill:#0d1a0e,color:#86efac,stroke:#22c55e,stroke-width:1.5px
classDef mem fill:#0d1b2a,color:#7dd3fc,stroke:#38bdf8,stroke-width:1.5px
```
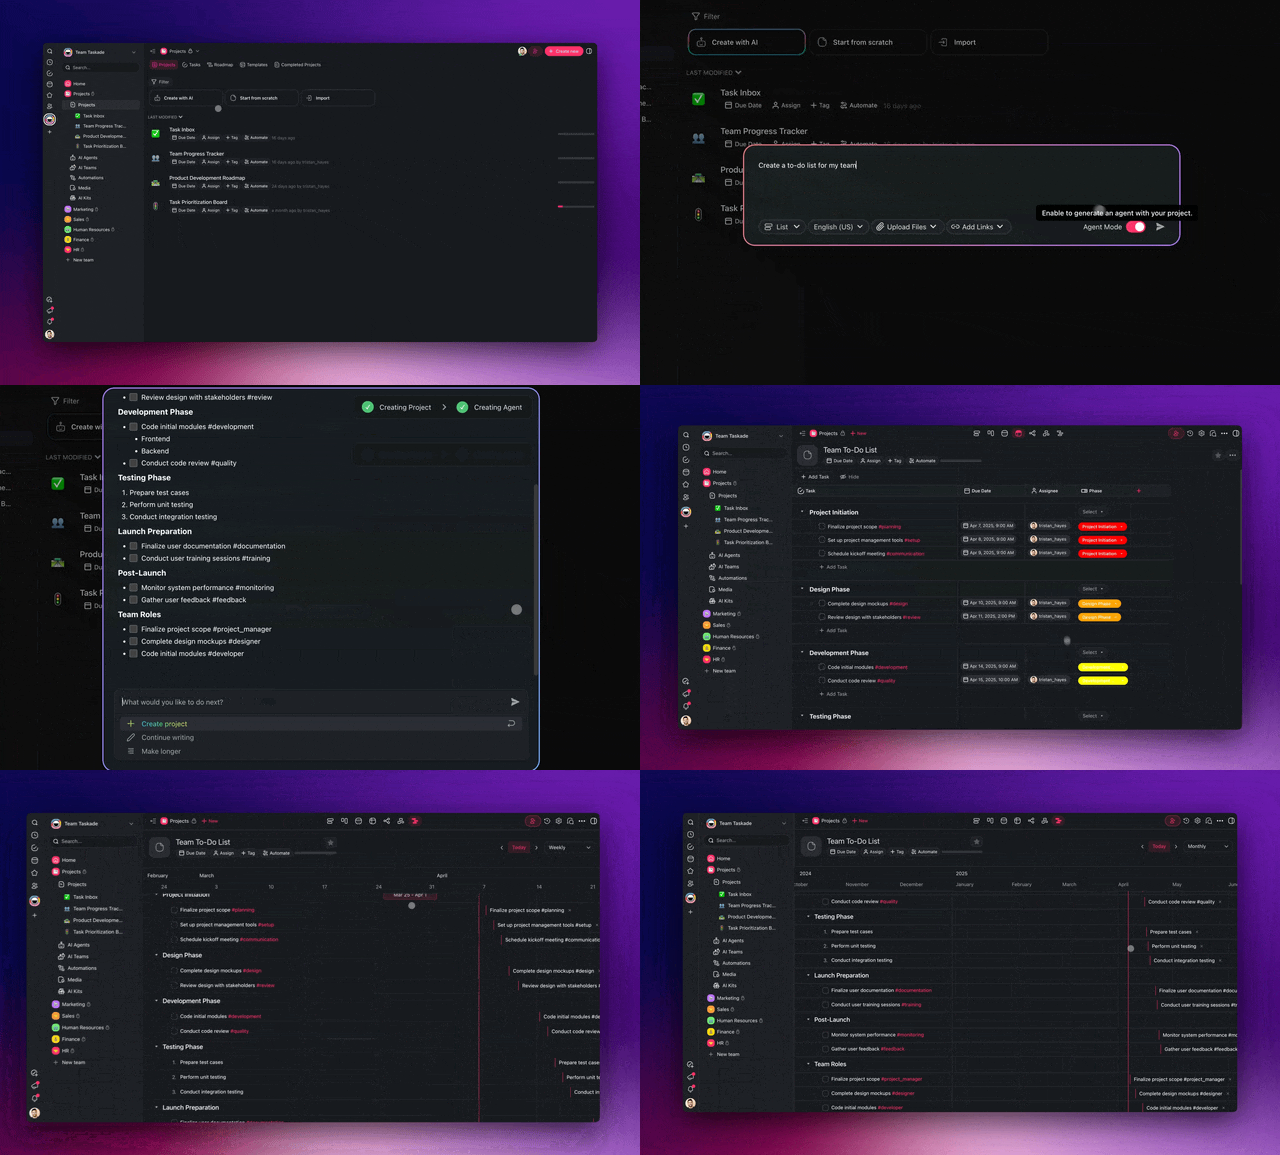
### Which triggers and integrations work on your plan?
**Free runs the built-in workspace steps plus four standard connectors: HTTP Request, RSS, Pushover and MCP Client.** Premium integrations such as Gmail, Slack, Google Sheets, Notion and Stripe need a paid plan, and some integrations need Pro and up. The webhook trigger is Pro and up.
| Trigger or step | Example | Plan |
| --- | --- | --- |
| Workspace triggers | Task Added, Task Completed, Task Due, Custom Field Updated | Every plan |
| Schedule | Every Monday at 09:00 | Every plan |
| Form trigger | A form that starts the flow when submitted | Every plan |
| Standard connectors | HTTP Request, RSS, Pushover, MCP Client | Every plan |
| Premium integrations | Gmail, Slack, Google Sheets, Notion, Stripe and more | Paid plans |
| Webhook trigger | An outside service calls your automation | Pro and up |
Free includes 10 automation runs per billing period, shared by the workspace. AI steps, such as asking an agent, use AI credits. Non-AI steps, such as moving a task, do not. Taskade connects to 100+ integrations in total. See the full catalog on the [integrations page](https://www.taskade.com/integrations) and the guide to [Automations](https://www.taskade.com/learn/automation/automations-execution). For ready-made flows, browse [Taskade automations](https://www.taskade.com/automate).
You are done with Step 7 when the **Runs** tab shows one successful run and the result shows in your project.
---
## Step 8: Publish Your App
**Click Publish in the top right of the app, choose who can open it, and Taskade gives the app its own web address.** On a live app, the same button reads **Update** when changes wait to go live, and **Live** when the app is up to date. Publishing works on every plan, and some options need Pro.
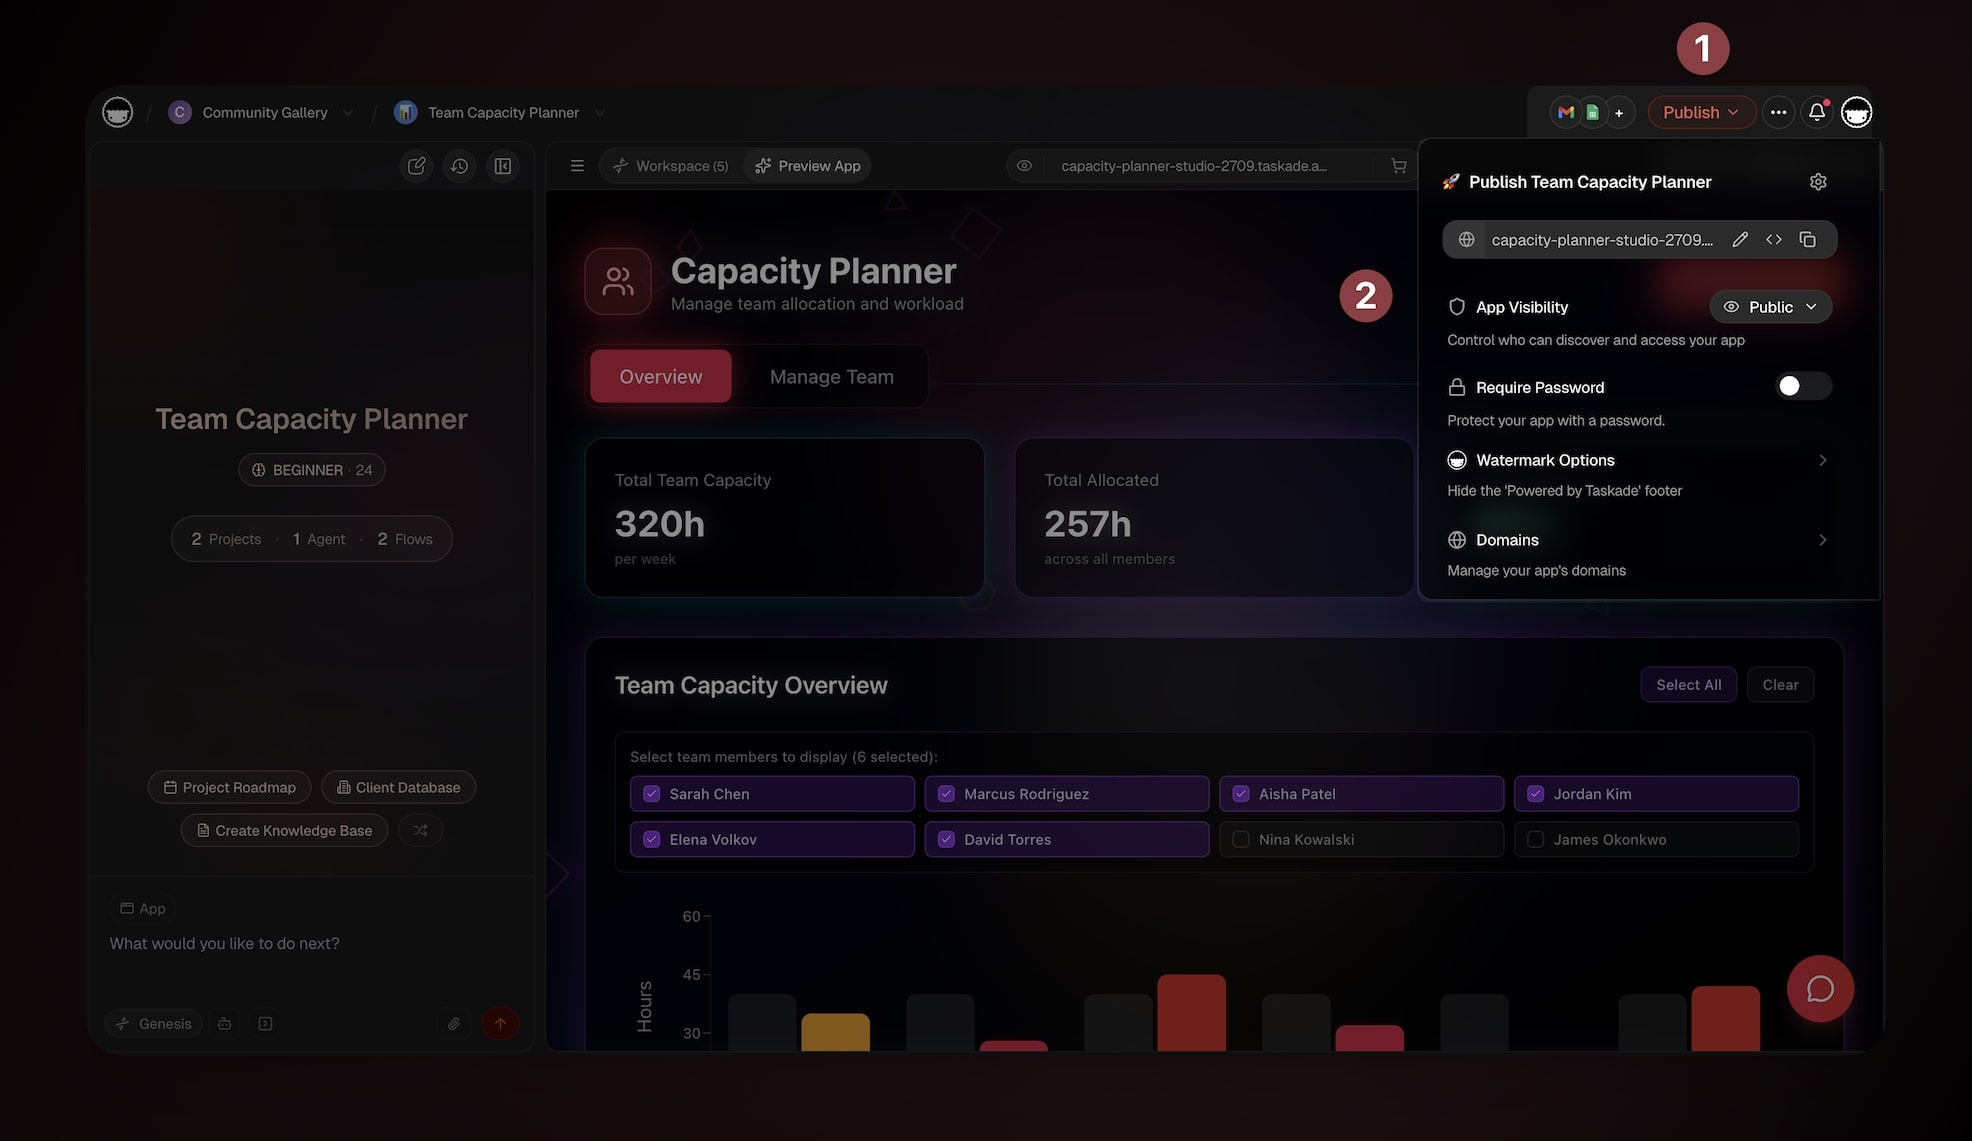
**Step 1: Choose who can open it.**
| Choice | What a visitor does | Plan |
| --- | --- | --- |
| **Anyone with the link** | Opens the app. No password needed | Every plan |
| **Anyone with the password** | Types one shared password first | Pro and up |
| **Each person signs in** | Signs in with their own account. You choose who can join under **Who can join** | Every plan |
On the first **Publish** of a draft, Taskade looks at the app and preselects a choice with a **Suggested** tag. For example, it suggests **Each person signs in** when a project holds emails or phone numbers.
**Step 2: Decide on the public listing.** Expand **More options**. Turn on **Show in public listings** to let anyone find the app in search and in the Taskade App Factory. Leave it off to keep the app unlisted, so only people with the link can open it.
**Step 3: Let others clone it only if you mean to.** A public listing does not make an app cloneable. Open **Let others clone**, then choose **Free** or **Paid** to let other people copy it as a kit.
```mermaid
graph TD
D[Draft app]:::draft
W{Who can open it?}:::ask
L[Anyone with the link
every plan]:::ok
PW[Anyone with the password
Pro and up]:::paid
SI[Each person signs in
every plan]:::ok
PE[Private entries
pick the owner field,
test with a 2nd account]:::paid2
LS{Show in public listings?}:::ask
U[Unlisted
link only]:::live
PUB[Listed
search and App Factory]:::live
D --> W
W --> L
W --> PW
W --> SI
SI --> PE
L --> LS
PW --> LS
PE --> LS
LS -->|Off| U
LS -->|On| PUB
classDef draft fill:#1e1e2e,color:#94a3b8,stroke:#475569
classDef ask fill:#2a1225,color:#ff8fa3,stroke:#ff2d60,stroke-width:2px
classDef ok fill:#0d1a0e,color:#86efac,stroke:#22c55e,stroke-width:1.5px
classDef paid fill:#1a140a,color:#ffb74d,stroke:#e65100,stroke-width:1.5px
classDef paid2 fill:#0d1b2a,color:#7dd3fc,stroke:#38bdf8,stroke-width:1.5px
classDef live fill:#1a0d24,color:#ce93d8,stroke:#6a1b9a,stroke-width:1.5px
```
### Sign-in confirms who a visitor is, not what they see
**App sign-in works on every plan, and it confirms identity, not privacy.** With **Each person signs in**, every visitor logs in with their own account. A signed-in person can still read every row of a project until you set up row privacy.
To show each person only their own rows, open **More options** on the live app and turn on **Private entries**. Pick the owner field that matches each row to a login. Then open the app with a second account and confirm that it sees only its own rows. Read [App Users](https://www.taskade.com/learn/genesis/app-users) before you put customer data in a public app.
### Where your app lives
| Address | What it is | Plan |
| --- | --- | --- |
| `your-app.taskade.app` | The direct link that every published app gets | Every plan |
| Taskade App Factory listing | A public page in the [App Factory](https://www.taskade.com/apps), if you turn on public listings | Every plan |
| Your own domain | A custom domain with an automatic security certificate | Pro (up to 10) and Business and up (unlimited) |
| Embed | One snippet that puts the app inside your existing website | Every plan |
Read [Publishing](https://www.taskade.com/learn/genesis/publishing) for every option, and [Custom Domains](https://www.taskade.com/learn/genesis/custom-domains) to connect your own domain. To see what makers ship, browse the [AI apps hub](https://www.taskade.com/ai/apps) and [our guide to free AI app builders](https://www.taskade.com/blog/free-ai-app-builders).
You are done with Step 8 when the header button reads **Live** and the app opens in a private browser window.
---
## Step 9: Share Projects and Invite Your Team
**Invite people to the whole workspace from Settings → Members, or share one project with the Share button, and give each person a role from Owner to Viewer.** Free includes 2 workspace members. Pro includes 10, and Business and up have no member limit.
| Goal | Where | What to pick |
| --- | --- | --- |
| Add a teammate to everything | **Settings → Members** | Send an email invite or copy the invite link, then pick a role |
| Share one project | 👤 **Share** in the top right of the project | Type an email or copy the invite link, then pick a role |
| Show a project to anyone with a link | **Share** → **Invite to project** → **Public** tab | Turn on **Share to web**. A password needs Pro and up |
| Put a project on your website | **Share** → **Invite to project** → **Embed** tab | Click **Copy** and paste the code into your site |
| Cut off an old link | **Share** → **Invite Link** tab | Click **Regenerate Link** |

### Roles from Owner to Viewer
**Taskade uses role-based access from Owner to Viewer, and roles cascade from the workspace to its apps and projects.** You can override a role at any level. An Owner holds the account and billing. An Editor creates and edits projects. A Viewer reads and comments but cannot check tasks off. Pick each role by what the person needs to do, and read [User Roles & Permissions](https://www.taskade.com/learn/projects/permissions) for the full matrix.
> **Note:** A member of your workspace does not get access to a private app inside it by default. Invite them to that app too.
### Chat next to the work
**Every Taskade project has its own chat, so questions and decisions stay next to the tasks they are about.** Click the 💬 chat icon in the top right of a project, choose **Team Chat**, and type. The chat supports Markdown, and you can record a screencast and attach it to a task or a message. Project members can also start a video call. If your camera does not show, see [Enable Your Camera for Video Calls](https://www.taskade.com/learn/projects/enable-camera). For the full guide, read [Chat and Messaging](https://www.taskade.com/learn/projects/chat).
You are done with Step 9 when a teammate opens your project from the invite and edits one task while you watch it change in real time.
---
## Which Taskade Plan Does a Beginner Need?
**Start on Free, and move to Pro at $10/month billed annually when you need AI credits, a second agent, a fourth app, a third teammate or a custom domain.** Pro is the plan most beginners need. Business adds single sign-on and higher volume, and Enterprise adds SCIM.
*Prices and limits checked on 2026-11-07 against the [pricing page](https://www.taskade.com/pricing) and [Compare Taskade Plans](https://www.taskade.com/learn/account/plan-matrix).*
| Capability | Free | Pro | Business | Max and Enterprise |
| --- | --- | --- | --- | --- |
| Price, billed annually | $0 | $10/month ($120/year) | $25/month ($300/year) | Max $100/month. Enterprise $250/month |
| Price, billed monthly | $0 | $20/month | $50/month | Max $200/month. Enterprise $500/month |
| Workspace members | 2 | 10 | Unlimited | Unlimited |
| Taskade Genesis apps per workspace | 3 | Unlimited | Unlimited | Unlimited |
| AI agents | 1 | Unlimited | Unlimited | Unlimited |
| Automation runs per billing period | 10 | 1,000 | 10,000 | 10,000 |
| Monthly AI credits | None. Earn credits with referrals and invites | 50,000 | 150,000 | Max 400,000. Enterprise 1,100,000 |
| Gantt Chart, Actionsheet, Org Chart | No | Yes | Yes | Yes |
| Password on apps and projects | No | Yes | Yes | Yes |
| Premium integrations and webhooks | No | Yes | Yes | Yes |
| Custom domain for apps | No | Up to 10 | Unlimited | Unlimited |
| Your own AI provider key (BYOK) | No | OpenAI, Anthropic, Google | Plus extended providers | Plus extended providers |
| SAML single sign-on | No | No | Yes | Yes |
| SCIM user provisioning | No | No | No | Enterprise only |
Automation runs and monthly credits are shared by the whole workspace, not counted per person. With your own Anthropic key on Pro and up, you can run Claude in custom agents. Read [Is Taskade Free?](https://www.taskade.com/learn/account/free-plan) for every Free limit.
```mermaid
graph TD
F[Start on Free]:::free
N{What do you need next?}:::ask
PRO[Pro
$10/month billed annually]:::pro
BUS[Business
$25/month billed annually]:::bus
ENT[Enterprise
contact sales]:::ent
F --> N
N -->|AI credits, a 2nd agent,
a 4th app, a 3rd teammate,
a custom domain, webhooks| PRO
N -->|SAML single sign-on,
more runs and credits| BUS
N -->|SCIM provisioning| ENT
classDef free fill:#1e1e2e,color:#cdd6f4,stroke:#475569
classDef ask fill:#2a1225,color:#ff8fa3,stroke:#ff2d60,stroke-width:2px
classDef pro fill:#0d1a0e,color:#86efac,stroke:#22c55e,stroke-width:1.5px
classDef bus fill:#0d1b2a,color:#7dd3fc,stroke:#38bdf8,stroke-width:1.5px
classDef ent fill:#1a0d24,color:#ce93d8,stroke:#6a1b9a,stroke-width:1.5px
```
You can switch plans at any time. A canceled plan stays active until the end of the billing period, and your projects, agents and apps are not deleted. See [Manage Your Subscription](https://www.taskade.com/learn/account/subscription).
---
## Common Beginner Mistakes and How to Fix Them
**Most beginner problems come from starting too big, skipping the test step, or not knowing a plan limit.** The table lists the common ones and the fix for each.
| Mistake | What happens | Fix |
| --- | --- | --- |
| Starting with a huge prompt for a whole business | Taskade Genesis builds many parts that you do not understand yet | Build one small app around one job, then add parts by chat |
| Expecting a prompt build on a new Free account | Taskade EVE shows **Pick a plan to start building** | Clone a free kit, earn credits with referrals and invites, or upgrade to Pro |
| Cloning a kit that holds automations on Free | Free blocks the import | Pick a free kit with no automations and at most 1 agent |
| Never clicking **Publish** after an edit | Visitors still see the old version, and the status reads **Changes not live yet** | Click **Publish** or **Update** after each change you want live |
| Treating sign-in as privacy | Every signed-in person can read every row | Turn on **Private entries**, pick the owner field, and test with a second account |
| Turning on every agent tool | The agent takes actions you did not plan | Turn on only the tools that the job needs |
| Skipping the automation test | A broken step fails silently on the first real event | Use **Test**, or send one real event, and read the **Runs** tab |
| Creating a second workspace for each client | Each workspace bills separately, and Free has 1 | Use one app per client inside one workspace |
| Writing everything in one long list | The project gets hard to scan | Indent under headings with **Tab**, or switch to Board view |
---
## What Older Taskade Tutorials Get Wrong
**Many Taskade tutorials on the web describe a product from before Taskade Genesis, and several quote plan facts that are no longer true.** We compared the top beginner guides for "how to use Taskade" on 2026-11-07. The table lists the claims we found and the current fact, so you can check any guide you read.
| Claim in an older tutorial | The fact on 2026-11-07 | Source |
| --- | --- | --- |
| The Free plan includes a monthly AI credit allowance | Free starts with 0 AI credits. You earn credits with referrals and invites | [Is Taskade Free?](https://www.taskade.com/learn/account/free-plan) |
| Organize work in Workspaces, Folders and Projects | Folders, Teams and Subspaces are now called apps | [Hierarchy Structure](https://www.taskade.com/learn/projects/hierarchy-structure) |
| A paid "Team" plan | Team is no longer sold. The current plans run from Free to Enterprise, and this guide recommends Pro for most beginners | [Pricing](https://www.taskade.com/pricing) |
| A fixed count of project views | Taskade lists views by name: List, Board, Table, Mind Map, and more under **More Views** | [Project Views](https://www.taskade.com/learn/projects/project-views) |
| Connect Zapier or Make to automate | Taskade has its own automations with 100+ integrations, and Zapier is one option | [Automations](https://www.taskade.com/learn/automation/automations-execution) |
| No mention of apps, Taskade EVE or publishing | Taskade Genesis builds and publishes apps, and Taskade EVE builds from a chat | [Create Your First App](https://www.taskade.com/learn/genesis/first-app) |
The fix is simple. Use the date on the guide, and check plan facts on the [pricing page](https://www.taskade.com/pricing) before you decide.
---
## Your First Week With Taskade: A Day-by-Day Plan
**Spend about 20 minutes a day for a week, and you will finish with a project, an app, an agent and an automation that do real work.** Each day adds one layer, so nothing feels like too much at once.
| Day | Goal | What to do | Learn more |
| --- | --- | --- | --- |
| 1 | Account and layout | Sign up, find the four areas, and set **Opens to** | [Workspace Layout Tour](https://www.taskade.com/learn/projects/ui-guide) |
| 2 | One real project | Move one list you keep elsewhere into a project, and switch between List, Board and Table | [Project Views](https://www.taskade.com/learn/projects/project-views) |
| 3 | Taskade EVE | Ask Taskade EVE to restructure the project and add a status field | [Taskade EVE](https://www.taskade.com/learn/agents/eve-assistant) |
| 4 | First app | Build an app from a prompt, or clone a free kit | [Create Your First App](https://www.taskade.com/learn/genesis/first-app) |
| 5 | First agent | Train one agent on your project and share its link | [Custom AI Agents](https://www.taskade.com/learn/agents/custom-agents) |
| 6 | First automation | Add one trigger and one action, then read the run | [Automations](https://www.taskade.com/learn/automation/automations-execution) |
| 7 | Go live | Publish the app, invite one teammate, and collect one real entry | [Publishing](https://www.taskade.com/learn/genesis/publishing) |
If you want ideas for your first real app, follow one of our step-by-step builds: a [booking system](https://www.taskade.com/blog/build-booking-system), an [invoice app](https://www.taskade.com/blog/build-invoice-app) or an [inventory tracker](https://www.taskade.com/blog/build-inventory-tracker). If you are comparing project tools, read [the best AI project management tools](https://www.taskade.com/blog/best-ai-project-management-tools).
---
## Taskade on Your Phone, Desktop and Browser
**Taskade runs in the browser, in desktop apps for Mac, Windows and Linux, and in mobile apps for iOS and Android, and your work syncs in real time across all of them.** Get every app from the [downloads page](https://www.taskade.com/downloads).
| Where | What you get | Good for |
| --- | --- | --- |
| Web browser | The full workspace, including the Taskade Genesis app builder | Building and editing apps |
| Desktop app (Mac, Windows, Linux) | The workspace in its own window | All-day work and focus |
| Mobile app (iOS, Android) | Workspaces, project views, chat, the AI assistant, automations and Quick Add | Checking tasks and capturing ideas on the go |
| Browser extensions | Taskade on your new tab, and a [web clipper](https://www.taskade.com/learn/connect/web-clipper) that saves links and highlights to a project | Saving ideas while you browse |
The mobile apps need a live internet connection, so there is no offline editing mode. See the [Mobile Guide](https://www.taskade.com/learn/projects/mobile-guide) for the phone layout and home-screen widgets.
---
## Frequently Asked Questions
### What is Taskade used for?
Taskade is used to plan work, keep notes and data, and build AI apps in one workspace. Projects hold your tasks and records, custom AI agents read that data and answer questions, and automations run the repeat work. Taskade Genesis turns a plain-English prompt into a live app built on those three parts, and Taskade EVE is the assistant that builds and edits all of it for you.
### How do I use Taskade as a beginner?
Sign up at taskade.com/signup and Taskade makes your workspace for you. Create one project and try the List, Board and Table views. Ask Taskade EVE to organize it. Then build or clone a Taskade Genesis app, train one AI agent on your project, add one automation, and click Publish. The whole path takes about 30 to 60 minutes.
### Is Taskade completely free?
Taskade has a Free plan with no time limit and no card required, so you do not need a free trial to start. It includes unlimited projects, 2 workspace members, 3 Taskade Genesis apps, 1 AI agent and 10 automation runs per billing period. Free starts with 0 AI credits. On Free, you earn free AI credits with referrals and invites, and you can upgrade any time. Pro costs 10 dollars a month billed annually, or 20 dollars billed monthly.
### Can I build a Taskade Genesis app on the Free plan?
Yes, with one limit to know first. Free holds up to 3 Taskade Genesis apps, but a new Free account has 0 AI credits, so a prompt build asks you to pick a plan until you earn credits. The fastest free path is to clone a free app kit from the Taskade App Factory. Pick a kit with no automations and at most 1 AI agent, because Free blocks the import of automations and allows 1 agent.
### What is the difference between Taskade EVE and a custom AI agent?
Taskade EVE is the assistant for your whole workspace. It builds Taskade Genesis apps, creates projects, sets up agents and wires automations from a chat. A custom AI agent is a narrower teammate that you build for one job, with its own instructions, knowledge, tools and a public share link. Use Taskade EVE to build, and custom agents to do a repeat job.
### Does Taskade have AI agents?
Yes. Every plan includes custom AI agents. Free includes 1 agent with 1 knowledge source, and Pro and up remove the agent limit. An agent answers from your projects and files, uses built-in tools such as web search and project actions, runs on frontier models from top AI labs, and can be shared with a public link or embedded on a website.
### How do I share a Taskade project or app with my team?
To add people to the whole workspace, open Settings, then Members, and send an email invite or copy the invite link. To share one project, click Share in the top right of the project. Pick a role from Owner to Viewer for each person. To share a Taskade Genesis app, click Publish and choose who can open it.
### How do I use Taskade on my phone?
Install the Taskade app from the Apple App Store or Google Play and log in with the same account. Your workspaces, projects, views, chat and the AI assistant sync in real time with the web and desktop apps. Taskade needs a live internet connection, so the mobile apps have no offline editing mode.
### Is Taskade safe to use?
Taskade encrypts every connection with TLS and uses AES-256 encryption for backups and stored automation credentials. Access follows role-based permissions from Owner to Viewer, and SAML single sign-on is available on Business and up. Taskade states that it is working toward SOC 2 Type II and that the audit is not yet complete. Read the full details on the Taskade security page.
### How does Taskade compare to Notion for beginners?
Notion is strong for long-form docs and wikis. Taskade starts from tasks and projects, adds real-time chat, and puts AI agents, automations and Taskade Genesis apps in the same workspace, so a beginner can go from a to-do list to a published app without a second tool. If your main job is a team wiki, try both on their free plans.
For a side-by-side look, read [Taskade vs Notion](https://www.taskade.com/blog/taskade-vs-notion). For security details, see the [Taskade security page](https://www.taskade.com/security). To close an account you no longer need, see [Close Your Account](https://www.taskade.com/learn/account/close-account).
---
## Keep Learning
**The fastest way to learn Taskade is to build one small thing that you will use tomorrow.** Pick one job from your week, run it through the nine steps, and improve it by chat.
- **Build:** describe your first app at [taskade.com/create](https://www.taskade.com/create), or clone a kit from the [Taskade App Factory](https://www.taskade.com/apps).
- **Agents:** browse ready-made [AI agents](https://www.taskade.com/agents) and read [Custom AI Agents](https://www.taskade.com/learn/agents/custom-agents).
- **Automations:** start from a [Taskade automation](https://www.taskade.com/automate) and read [Automation Triggers](https://www.taskade.com/learn/automation/triggers).
- **Templates:** start a project from the [template gallery](https://www.taskade.com/templates).
- **Students:** see [Taskade for Students](https://www.taskade.com/learn/projects/for-students).
- **History:** see how the product looked in our [2021 year in review](https://www.taskade.com/blog/2021-year-in-review-taskade-milestones) and the [V4 editor refresh](https://www.taskade.com/blog/new-editor-layout-earn-free-credits-export-to-pdf).
- **Visual work:** read [Visual Collaboration 101](https://www.taskade.com/blog/visual-collaboration-guide) on mind maps, boards, outlines and org charts.
Memory holds your work, intelligence reads it, and execution moves it forward. Start with one project, and let the loop grow from there. ▲ ■ ●